Fabric calculation guide · Style HC-S05
How to Calculate Fabric for a Pleated Skirt
Calculate the flat span of each pleated panel, then ask your supplier for a cutting layout to estimate fabric use per skirt.
Editable panel and quote tabs plus a filled HC-S05 example.
In this guide
The Quick Calculation, With a Worked Example
Measure the Finished Panel and Add the Total Pleat Intake
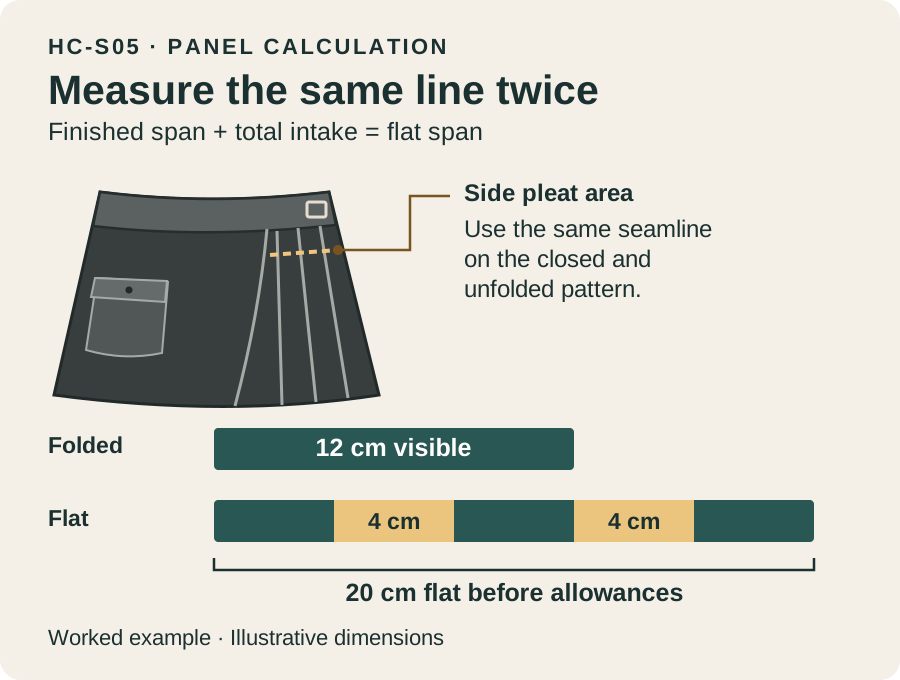
Choose one reference line on the pattern, usually the waist seamline for a pleat secured at the waist. Measure the finished span between the two ends of the pleated panel with the folds closed. Then add the fabric tucked into the folds along that same line. The total hidden width of a fold is its intake. Use the intake marked on the pattern or unfold a measured trial panel to confirm it. If a pattern names only the visible pleat width, ask the pattern maker to identify the fold and placement lines before calculating.
In the HC-S05 exercise, the finished side panel spans 12 cm. Two folds each take up 4 cm, so the unfolded panel spans 20 cm on the same reference line. Enter 4 cm per fold in the workbook, or enter 8 cm as the total intake when working from a pattern with different amounts per fold. The uniform and total inputs describe the same fabric, so choose one input method for each row.
| Input | Example |
|---|---|
| Finished span on the seamline | 12 cm |
| Total pleat intake | 2 folds × 4 cm = 8 cm |
| Flat span before seam allowances | 20 cm |
For a side panel that flares, repeat the width check where the folds change or release, such as the hip line. Keep the readings tied to their measurement positions. If you measure the folded waist and compare it with a flat hem, the difference includes shaping as well as pleat intake. For a paper pattern, trace the seamline, fold it along the marked lines and check the finished span against the pattern specification.
Add Seam Allowances Separately
If the seamline span is 20 cm and the pattern calls for a 1 cm allowance at each end along that line, the illustrative cut span is 22 cm. For angled or shaped seams, take the cut width from the drafted pattern and measure at the relevant line. A panel can widen between the waist and hem. Keep the hem turn-up on its own pattern edge, where it affects the length and shape of the piece. This gives the pattern maker a checkable dimension and gives the costing team the actual outline to place in a cutting layout.
Record the unit with each measurement. A supplier may use centimeters for pattern measurements and meters for roll consumption. Keep the panel worksheet in a single unit and convert once when recording the quotation. If the sketch, tech pack and pattern report disagree, highlight the discrepancy beside the sample revision and ask which document controls. The University of Nebraska–Lincoln’s skirt pleat plotting reference illustrates how fold and placement lines are plotted on a pattern.
Count Only the Pieces That Actually Carry Pleats
Side Pleats, Full-Circumference Pleats, and Different Fold Types
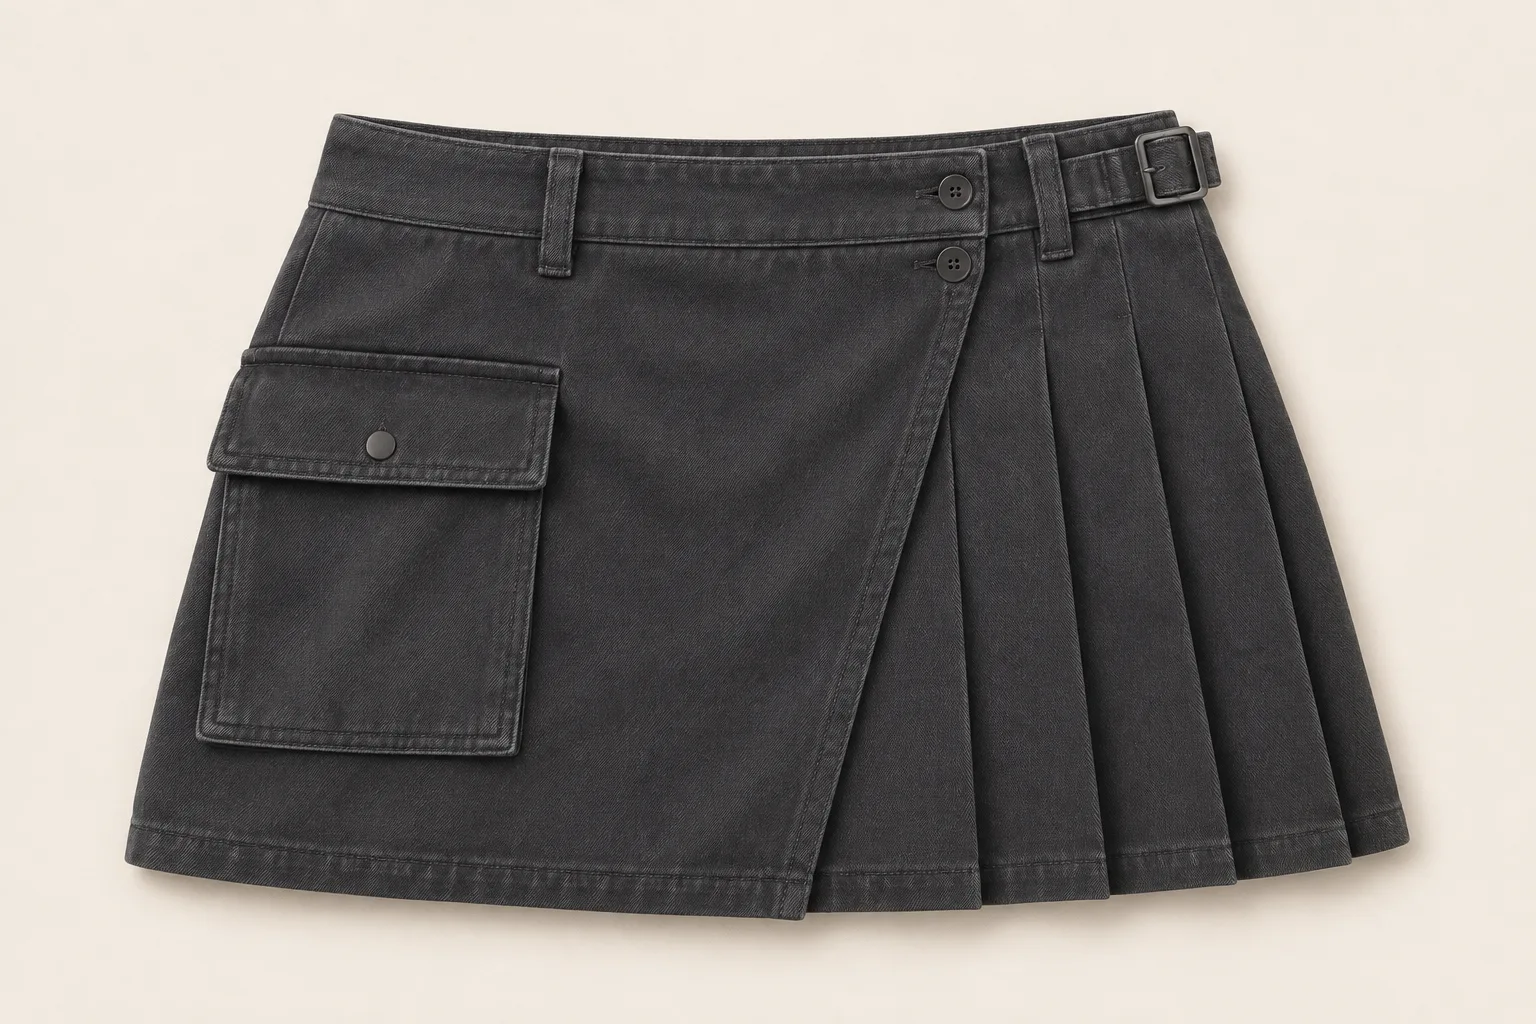
Start with the piece list. For a skirt pleated around the body, intake may be spread across front and back pieces. For a style with a local pleated insert, calculate its own finished span and take-up, then list any flat adjacent pieces separately. HC-S05 is a utility mini skirt development concept with side pleats, a cargo pocket and a buckle tab. Its image helps identify where the folds and pocket sit. The dimensions in this guide are hypothetical, and the finished sample and pattern determine the actual piece geometry and cut count.
A knife pleat folds in one direction. A box or inverted box pleat has opposing folds. The fold arrangement and the desired amount of overlap determine the intake. If a pattern uses different intakes across a panel, add the actual hidden amount of each fold. A single average can obscure a deep fold placed next to a closure or pocket. For a panel with directional or mirrored pieces, give each piece its own label and indicate the required orientation. The University of Arkansas apparel production guide shows the main fold types and how the pattern directs their placement.
Check the Waistband, Lining, Pocket Pieces, and Hem Separately
Keep a cut list beside the panel math. Include the waistband, facing or interfacing, pocket flap, pocket bag, and lining if specified. A waistband may be cut in shell fabric with its own direction and joins. A lining might follow a simpler shape, with ease, a free hem or attachment points decided in the sample. Specify which shell pieces share the same fabric article and which parts use another material. When the pocket interrupts a pleated area, ask the supplier to identify how it is mounted and which pieces belong in the same layout.
At the first fitting, check whether the pleats hang as intended from the waist and recover after sitting. Review the pocket and buckle against the fold positions, and record any change in pleat depth, seams or hem. A fit revision may change the outline or add a piece. That is a reason to request a new costing layout on the next revision, even if the fabric article stays the same. Use the garment tech pack guide to keep the pattern, measurement sheet and construction references on the same revision.
Turn Panel Width Into a Fabric Consumption Estimate
Confirm Usable Roll Width, Grain Direction, and Pattern Matching
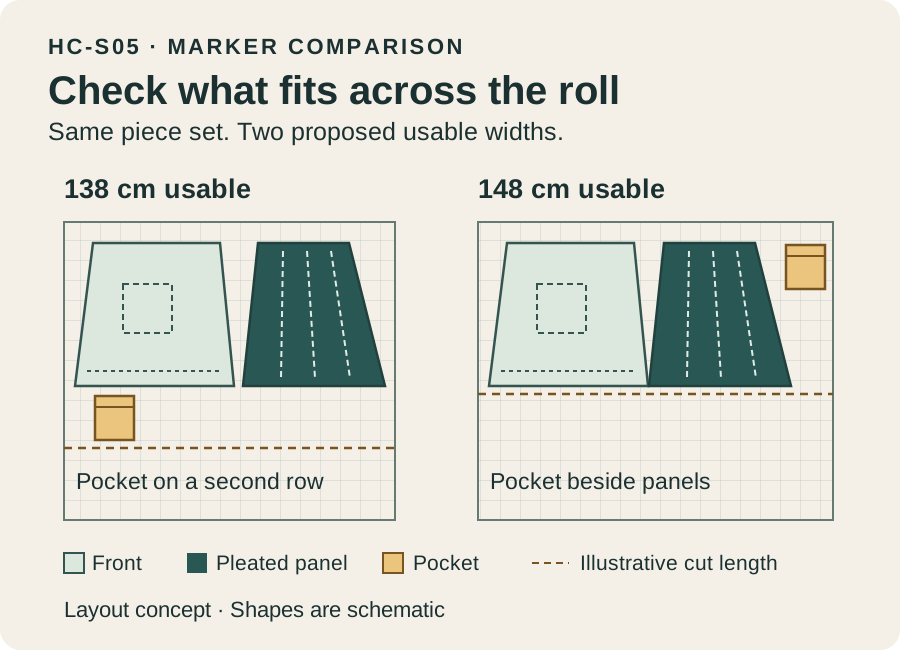
A cutting marker is a layout of the pattern pieces on the usable width of a fabric. Panel width describes one piece across a reference line. Fabric consumption describes how much roll length is allocated to each garment, after arranging the pieces. Ask for the usable cuttable width for each fabric article and color, with selvage or unusable edge excluded as agreed. Also record any one-way nap, print direction, grain restrictions or repeat matching. These conditions affect how the pattern pieces can sit next to each other.
For example, ask whether the same panel set fits side by side on a proposed 138 cm width and a proposed 148 cm width. If a pocket or waist piece nests in a gap on the wider layout, the extra width can change the length needed. If both widths fit the same arrangement, the wider option may yield the same length. Request a layout for each width under the same direction rules. Use the fabric GSM guide when comparing the fabric proposals themselves, and keep the measured width as a separate input.
Request a Cutting Layout for the Intended Size Mix
Send the quantity by color and size with the pattern revision. A marker built for several sizes reflects a different cutting scenario from a single base-size layout. Ask which sizes are included, how many complete garments the layout contains and what remains outside it. The workbook divides marker length by the number of complete garment sets in that marker. For an illustrative 5.40 m shell layout containing six complete sets, the net figure is 0.90 m per garment. Record the marker ID so the figure can be traced back to the layout and pattern.
Compare net consumption under the same constraints before comparing fabric cost. Check whether the supplier placed every shell component, including any pocket or waistband cut from the shell, and whether plaid matching or directional cutting was allowed for. If a revised print or a different size split arrives after the estimate, ask which layout needs to be redone. That also gives you a clean way to compare a first quote and a revision without guessing what changed.
To check the returned figure, ask for the length of the marker and the number of full sets in it. A count of six front pieces could describe six skirts, or three skirts with two front pieces each. Count complete garment sets and compare the included sizes with the proposed order ratio. If a size is missing from the marker, ask for a revision or record it as a separate costing case.
Keep Shell, Lining, and Allowances Separate
Ask each supplier to identify the scope of the number returned. Net marker use, extra fabric per garment and a bulk purchase quantity can differ. If the supplier gives a percentage allowance, confirm its base and what it covers before adding it. A fixed extra quantity per order should stay on its own line. Ask whether shrinkage is accounted for in pattern dimensions, a separate allowance or another agreed basis, so the same adjustment is counted once.
Request separate records for lining or pocketing when they come from different rolls. Each can have a different width, direction or unit price. A simple prototype can settle how the shell and lining move together before the pattern goes into a costing marker. Use the development and sampling page to frame which questions the next sample should settle, and keep the proposed fabric quantity provisional while those questions are open.
Compare Two Quotes With the Same Fabric Assumptions
Log the Pattern Revision, Fabric Reference, and Size Breakdown
Send both suppliers the same pattern revision, construction notes, color list, size breakdown and requested quote basis. Ask each supplier to return its usable width, marker length, garment sets, net use per piece, and the allowance and components included in the unit price. If a supplier proposes a different fabric or changes the pleat construction, ask for the change to be listed as an alternate. That lets you compare the original brief across quotes and decide whether the alternate deserves its own sample.
A lower unit price deserves a scope check. One supplier may price the shell and lining while another prices the shell with the lining pending. Check the named fabric articles, units, currency and delivery basis as well as the finish and sampling scope. If a marker covers a different size mix, request a comparable run or keep the quote marked provisional. Use the manufacturing cost guide for the other quotation inputs that sit outside fabric consumption.
Swipe or scroll to compare the quote fields.
| Check | Ask each supplier for | Compare on the same basis |
|---|---|---|
| Pattern and piece scope | Pattern and marker revision, included shell pieces | Same design and cut count |
| Layout conditions | Usable width, size mix, direction and repeat rules | Same quote constraints or documented alternates |
| Fabric and allowances | Net marker use, separate extras, lining and pocketing | Same units and clear inclusions |
| Commercial terms | Currency, unit price, quote basis and open items | Same order scope and delivery basis |
If the two quoted consumptions differ, start by comparing the two layout IDs and the number of garment sets. Next check whether both figures include the same pieces and whether one includes an allowance. A difference may come from the pattern version, a missed component or a tighter directional constraint. Keep a short note beside each difference so the buyer reviewing the quotation can distinguish a design change from a different costing assumption.
Download the Pleated Skirt Fabric Calculation Workbook
Use Panel calculation to enter finished spans, total intake and seam allowances for each pattern piece. The workbook leaves calculations blank until the necessary inputs are present. Use Supplier quotes to capture both suppliers’ marker assumptions and compare their net shell and lining use alongside the returned prices. The HC-S05 example shows the completed panel calculation and a sample quote comparison using fictional figures. Copy the blank tabs for your project and attach the supplier’s actual layout separately. This keeps the original measurements and any provisional assumptions visible when the sample is revised.
Frequently Asked Questions
Can I Multiply the Waist Measurement by Three?
A multiplier can describe a specific, evenly pleated layout when the folded geometry supports that ratio. For a utility skirt with pleats limited to side panels, work from the finished span of each pleated section and add its actual intake. List flat panels separately. Confirm fold depth and placement with the pattern maker before the estimate is used for a quotation.
Does a Wider Roll Always Reduce Fabric Consumption?
A wider usable roll gives the pattern pieces more space across the marker. Savings depend on whether that width changes the placement or nesting of the actual pieces. Grain, print direction, repeat matching and the size mix can constrain the layout. Ask for the length and garment count from comparable markers at both widths, then compare the length per garment.
How Should I Estimate Lining and Waistband Fabric?
List the lining shape, cut count and fabric article separately from the shell. If the waistband uses the shell fabric, confirm that its pieces are included in the shell marker. If it uses a different fabric, request its own consumption basis. Record where interfacing, pocketing and trim are priced so each quote can be traced back to the same piece list.
When Can I Use an Estimate to Request a Quote?
Use an estimate once the silhouette, pattern revision, proposed fabric widths and planned size quantities are clear enough for both suppliers to work from the same brief. Mark provisional fields and ask suppliers to state their assumptions. Confirm the costing layout again after the fit, fabric and order split are settled, before using the number to plan bulk fabric purchasing.
Prepare Your Pleated Skirt Brief for Quotation
Open the women’s skirt development gallery and select HC-S05 to carry that style reference into the inquiry. Describe which panels you want pleated, identify the controlling pattern revision, and list the shell and lining references, usable widths and quantity by color and size. If you have only a sketch, describe the finished silhouette and the dimensions the first pattern needs to establish. Paste the relevant worksheet figures and open questions into the project description. Keep the workbook and any drawings ready to share with your contact during follow-up.
For a different skirt silhouette, use the skirt inquiry form and describe the reference, intended construction and open decisions. The buyer toolkit has supporting documents for the wider handoff if the pleat worksheet is one part of a fuller product brief.
Choose HC-S05, then select “Prepare an RFQ for this style.”