Tech pack example · Style HC-S08
Cargo Pants Tech Pack Template for Womenswear Brands
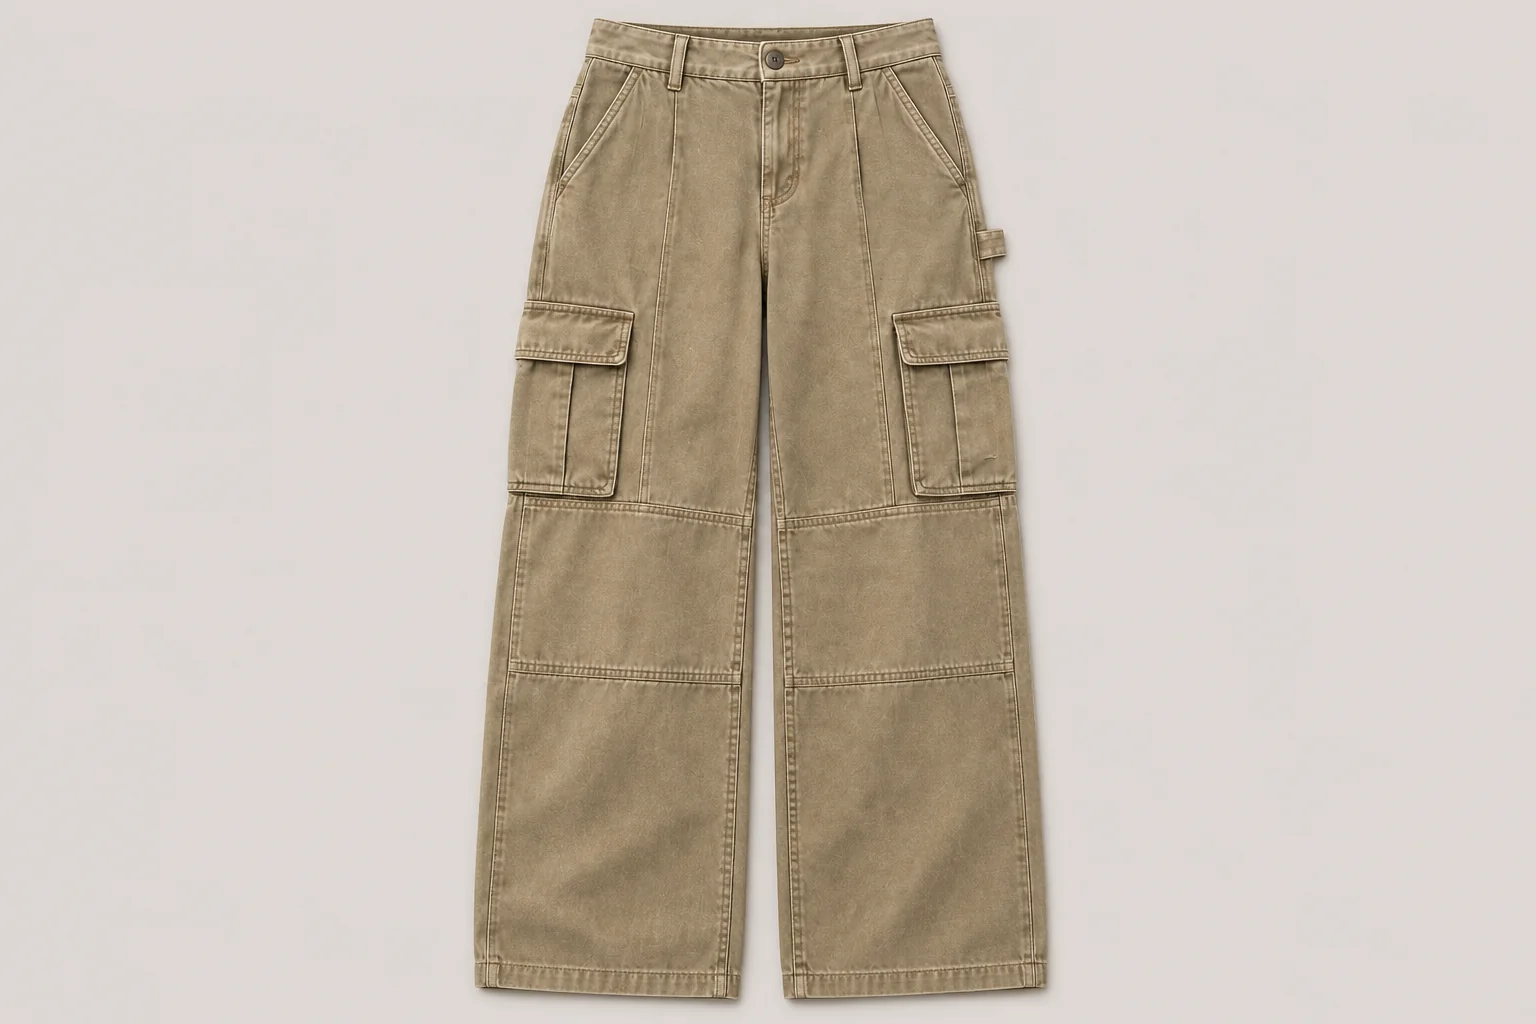
See how to specify wide-leg cargo pants for sampling and use the blank Excel workbook to brief your own style.
- Flat waist width
- 37.0 cm
- Cargo pocket drop
- 18.0 cm
- Knee reference drop
- 47.0 cm
Use the workbook for measurements, pocket and knee construction, and quote notes.
In this guide
- See the Filled HC-S08 Example and Download a Blank Template
- Specify Waist, Rise, Thigh, and Leg Opening
- Draw Cargo Pocket Placement, Access, and Reinforcement
- Document the Knee Shape and Placement Across Sizes
- Send One Revision for Sampling and Comparable Quotes
- Frequently Asked Questions
- Prepare the HC-S08 Trousers Inquiry
See the Filled HC-S08 Example and Download a Blank Template
What the Factory Needs for the First Quote
A cargo pants tech pack puts the style drawings, materials, finished garment measurements, pocket details, and revision history in one place. Use the filled HC-S08 example above to see how the entries work. The stone-colored, wide-leg concept shows a relaxed leg, prominent cargo pockets, and shaping around the knee. Add a front and back technical flat, a side view of the pocket, and a named fit reference before requesting a development sample.
Start the pack with a style ID, revision, base size, unit, colorway, and sample purpose. List the material and construction decisions that affect the quote. The body fabric and pocket bag each need a reference. The flap closure and reinforcement need a drawing or a supplier proposal. When a detail can be proposed by the factory, identify the decision owner and ask for the drawing or sample that will settle it. The clothing tech pack guide explains how a manufacturer reads a cross-category specification.
On the materials sheet, give the body fabric, pocket bag, fly, waistband closure, and flap closure their own rows. Add the shade standard, swatch or trim code, and where each component is used. If the supplier proposes a fabric change, record its reference and where you expect the change to show up on a sample. Keep the body fabric, visible pocket panel, and interior pocket bag identifiable even when two parts share a fabric. That gives the buyer a specific row to approve before the next cut.
Make the Example Traceable to the Drawing
The example uses a 37.0 cm flat waist width, an 18.0 cm pocket drop, and a 47.0 cm knee reference. Each is an illustrative buyer target for the named base size. Put the measurement ID on the drawing and in the worksheet so a correction points to one place. In the example, the pocket drop runs from the top waistband edge at the side seam to the top edge of the flap, and the knee reference is measured from the same waistband landmark to a line drawn on the leg.
List a proposed value in the supplier column and a measured value with the sample ID. A buyer can then see which decisions were made from the drawing and which were checked on a garment. The blank workbook provides these fields for a new style. CLO-SET documents the use of separate material, construction, and measurement sections in a tech pack.
Four editable sheets cover the style and materials, measurements, pockets and knees, and revisions and quotes.
Specify Waist, Rise, Thigh, and Leg Opening
Define Finished Garment Points of Measure
A point of measure, or POM, pairs a dimension with a start point, end point, and measuring method. Choose one unit for the pack. State whether the garment is closed, laid flat, and relaxed when measured. For a flat waist, close the waistband and measure straight across between the agreed edges. If the waistband is shaped or elasticated, draw the measuring path and state which conditions apply. Specify whether a given row is a flat width or a full circumference.
For the front and back rise, define the crotch junction and indicate whether the waistband is included. If the tape follows the seam, show that path. For the thigh, give the offset from the crotch junction and indicate whether the tape runs square across the leg. For the leg opening, identify the finished hem edge and measure the single leg flat. These methods make it possible to compare the finished sample with the target, even when two people measure in different locations.
Include the inseam or outseam if the range has more than one length. State whether the size and length combinations use the same pocket positions. A petite version may need its own knee reference even when the buyer wants the same pocket proportions. Record the intended shoe or fitting height if it affects where the hem should sit. Ask the supplier to identify which size and length it sampled so the review can be matched to the correct column in the pack.
Body measurements and finished garment measurements answer different questions. When the team starts from a fit model, capture the body reference in its own record and agree on the intended ease before writing finished garment targets. For instance, a body waist and a closed flat waistband are recorded differently. New Mexico State University’s pants fitting guide illustrates waist, hip, thigh, knee, and crotch landmarks on the body.
Swipe or scroll to compare the measurement fields.
| Point | Method to record | Example entry |
|---|---|---|
| P01 · Flat waist | Fasten the waistband. Measure straight across the top edge while relaxed. | 37.0 cm target |
| P03 · Front rise | Define the crotch junction, measuring path and whether the waistband is included. | Confirm from fit reference |
| P08 · Pocket drop | At the side seam, measure from top waistband edge to top edge of cargo flap. | 18.0 cm target |
| P09 · Knee reference | At the side seam, measure from top waistband edge to the marked knee reference line. | 47.0 cm target |
Set Tolerances and Select Sizes to Review
Add an acceptance tolerance to each critical target once the pattern and production teams agree on it. A tolerance is the permitted variation around a target for a given size. A grade changes the target between sizes. Put the base size in the style card and record grade rules or finished targets separately. Ask the pattern team which changes could shift the pocket or knee position when the rise and leg proportions change.
Choose fit samples that answer the important questions. Use the base size to review the initial waist position, leg shape, and access to the pockets. For a later size set, review how the same features behave toward both ends of the range. Keep a record of whether measurements were taken before or after garment finishing. If a project calls for testing length and width change after home laundering, agree on the applicable conditions and acceptance criteria. AATCC TM150 describes the scope of garment dimensional change after home laundering.
Draw Cargo Pocket Placement, Access, and Reinforcement
Locate the Pocket and Define the Usable Opening
Give each outer pocket an ID and add a side flat. Put vertical and horizontal placement on separate rows. A useful vertical drop starts at the top waistband edge where it meets the side seam and ends at a specified flap edge. For horizontal placement, state how the pocket or flap aligns to the side seam. If the pocket straddles the seam, show which portion sits toward the front and which sits toward the back. A front view gives context. The side detail provides the measuring landmarks.
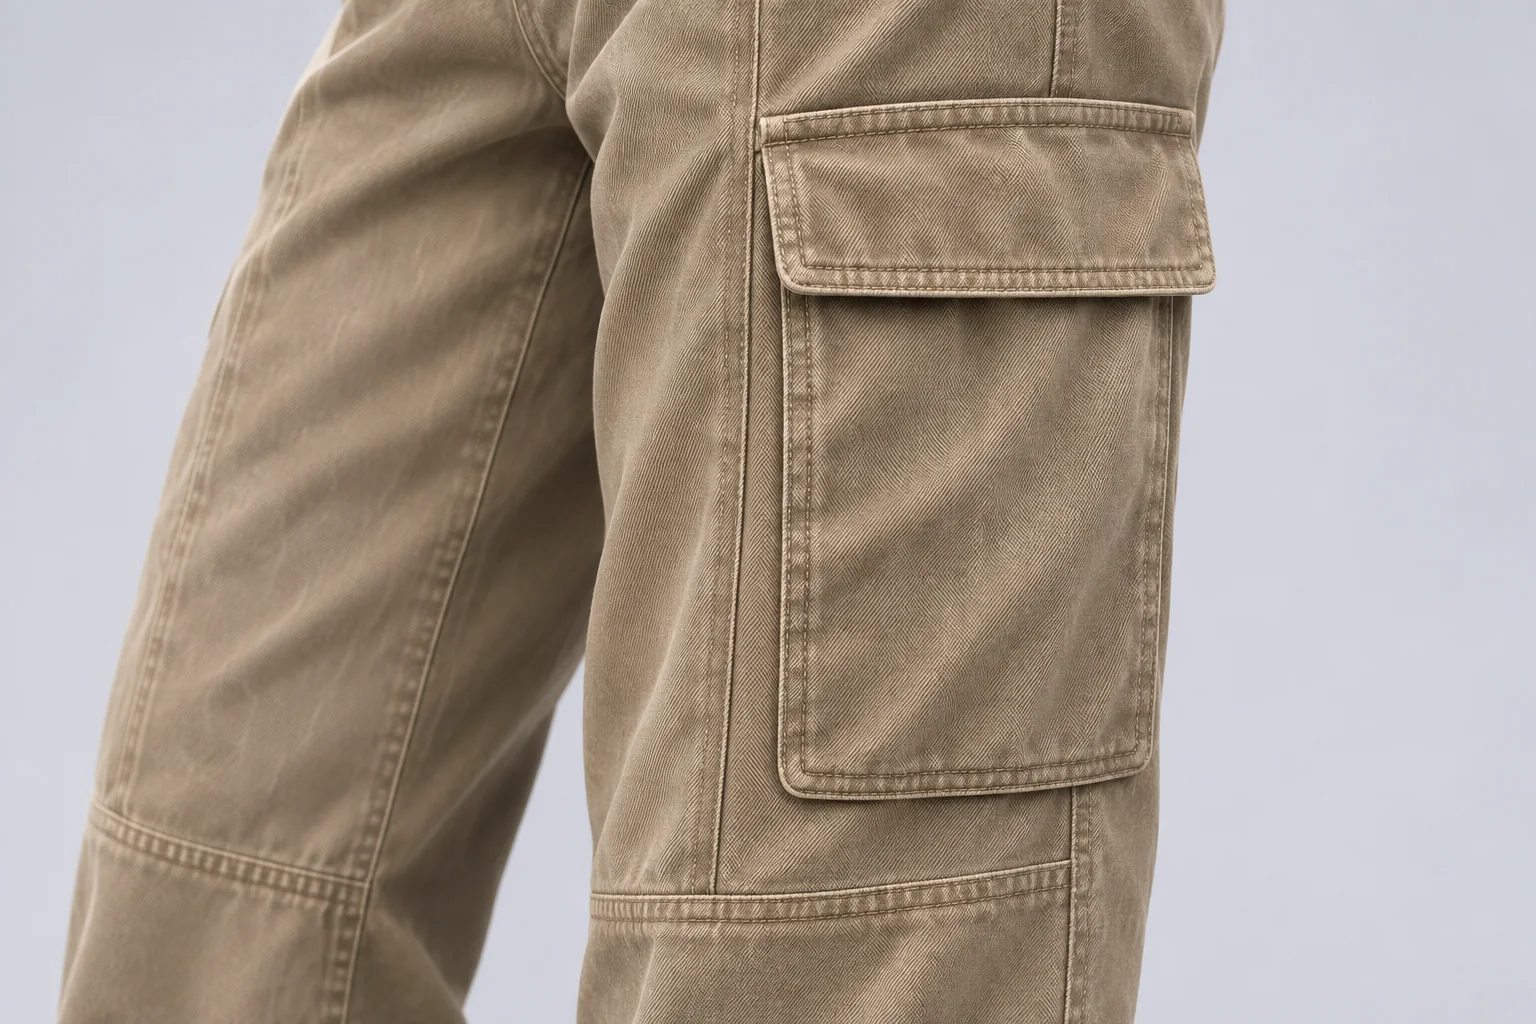
Record finished pocket width, height, usable opening, flap overlap, and any planned expansion. Where a pleat or gusset is proposed, draw the relaxed and expanded states so the reviewer can judge volume and access. Include the closure position and reinforcement points in the drawing. Ask the supplier to identify the construction it included in the quote and provide a detail photo of any proposed reinforcement before approving a sample.
Mark the left and right pockets separately if the design is asymmetric. A flap or tab visible in the image can have a different purpose on each side, and the factory needs to know which side should carry it. Specify the finished opening and flap measurements before discussing seam allowance. Where a closure is still open, ask for a proposal that shows its position, how it will be installed, and the visible effect on the outside of the garment.
Review the Pocket on a Worn Sample
Check access standing and seated. Ask the fit reviewer to open the flap, reach into the pocket, and confirm the usable space with the agreed test item if there is one. Observe whether the flap or pocket pulls across the leg when the knee bends. Check both sides. If the problem follows the opening angle, request a change at the opening. If the pocket sits too low to reach comfortably, record the measured placement and propose a new target in the pack.
A pocket construction can look different when sewn in an alternate fabric. Keep the swatch ID with the pocket trial and record whether the edges lie flat, the flap closes consistently, and the seam distorts in use. When choosing fabric and evaluating the sewn pocket together, use the cargo pants fabric and pocket trial guide.
Document the Knee Shape and Placement Across Sizes
Draw a Reference Line and Show the Proposed Construction
Mark a knee reference on the front and side flats. Tie it to a garment landmark such as the top waistband at the side seam, then draw the construction lines separately. On the HC-S08 concept, the visible crosswise seams sit around the knee area. The dashed line in the illustration shows one way to mark the location the fit team should review. For a new pattern, ask the supplier to explain how it proposes to achieve the shape and which seams or folds it will use.
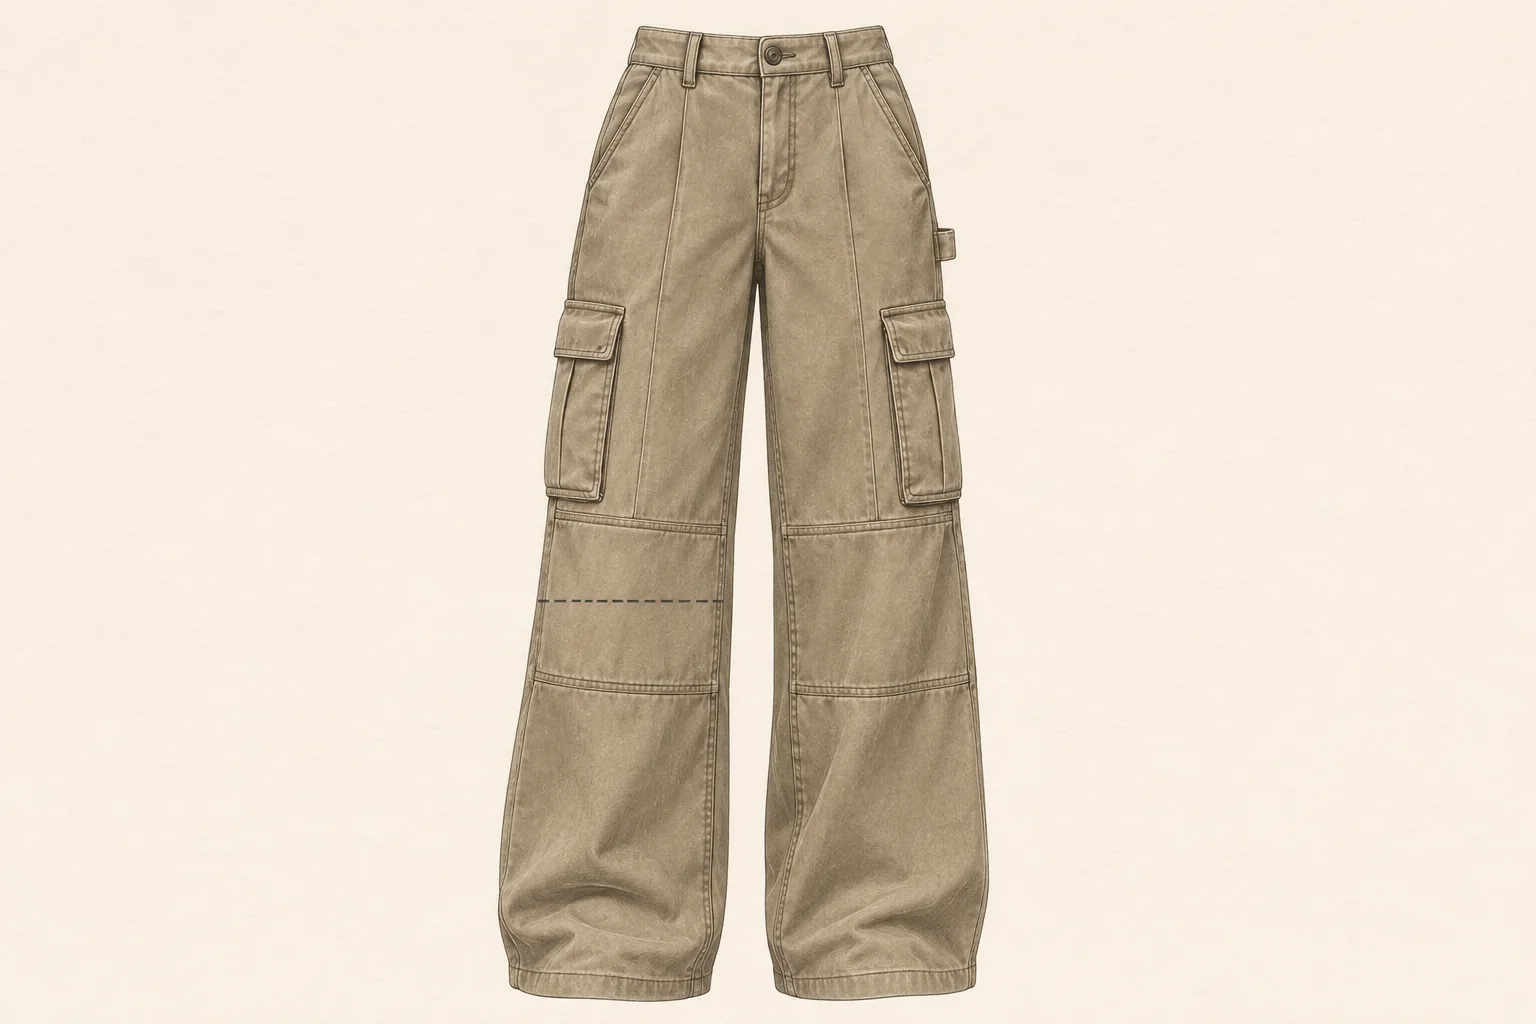
Place the pocket and knee reference on the same drawing so their relationship is visible. When the fit reviewer asks to raise the knee shaping, specify which seams move and whether the pocket drop should stay fixed. Record the measured distance between the bottom of the pocket and the nearest shaping seam if that clearance matters to the design. Use a revised drawing to show the corrected relationship and label the same points on the next sample.
Check Standing and Seated Fit
Photograph the sample from the front and side while standing, then ask the fit model to sit and bend the knee. Record where the garment naturally creases, whether the shape sits where intended, and whether the hem or pocket shifts noticeably. Check if tension comes from the thigh, knee shaping, or another area before changing the pattern. Tie each observation to a size, sample ID, and drawing mark. A comment such as “move upper knee seam up on the front panel” gives the pattern team a location to discuss.
When a fit comment calls for more room, record where the wearer feels restriction and which position brings it on. Ask for the current thigh and knee measurements so the next reviewer can see whether the sample already differs from the targets. The pattern team can then propose changes to width or construction with a clear reason. Repeat the same standing and seated checks on the revised sample and record which observations have been resolved.
Send One Revision for Sampling and Comparable Quotes
State What the Price Should Include
Send each supplier the same drawings, measurement methods, bill of materials, quantity split, and revision. List the items that can change the price, such as the pocket construction, the closure, and the panel arrangement around the knee. Ask for the sample scope and any material or construction assumptions. If a supplier proposes a different finish or a simpler pocket, request a separate price and a note on the effect on fit or appearance. Use the same reference when comparing quote responses.
Include the sizes, colorways, and material options in the quote response. Ask whether the estimate covers a fit sample, a separate pocket trial, or any revised construction drawing. A sample quote can differ in scope even when the quoted trousers look similar on paper. Record the work that is included and the open approvals on the same line as the price so you can compare like-for-like responses and identify the next decision.
Keep one revision log with a date, reason, affected drawing or POM, decision owner, and sample reference. If an approved change affects another part of the garment, update both records together. Moving a side pocket, for example, can alter its distance from the knee seam. Ask the supplier to acknowledge the revised file before starting another sample. The product development and sampling page explains how to link the sample purpose and review record.
Frequently Asked Questions
Can I Request a Quote Before the Size Set Is Ready?
A preliminary quote can start with the base-size measurements, proposed size range, expected size split, and the decisions still open. Ask the supplier to show its assumptions for material use, closures, and pocket construction. Request an updated quote after grading if the final dimensions or size mix change those assumptions.
Should the Cargo Pocket Move With Each Size?
Ask the pattern team to propose how the pocket should move relative to the waist, side seam, and knee. The answer depends on leg proportions and the intended reach. Review the proposed placement on representative sizes while worn, and record the position and clearance targets on the drawings for those sizes.
How Do I Specify the Knee Shape From a Reference Photo?
Use the photo to mark the desired location and silhouette. Add a front and side drawing with a knee reference tied to a fixed garment point. Ask the supplier to show its proposed construction and confirm it on a fitted sample in standing and seated positions.
What Should I Send With the Excel Workbook?
Send revisioned front, back, and side flats, photos of any physical references, the material and trim references, and the intended quantity and size split. Keep the same style and revision ID on all files. List the information the supplier should propose before starting the first sample.
Prepare the HC-S08 Trousers Inquiry
Start With the Style and the Next Sample Decision
Open the trousers development gallery and select HC-S08. Include the style ID, pack revision, base size, intended size and color split, and the questions you want the first sample to resolve. Paste the most important fields into the project description and keep the workbook and drawings ready for follow-up. For a different style, use the trousers inquiry form and describe the fit and construction you want reviewed.
Choose HC-S08, then select “Prepare an RFQ for this style.”