Style HC-S17
Types of Pleats for Skirts and How to Sample Them
Choose skirt pleats by where you want fullness, how the folds look at rest and what needs to open during movement. Compare the fold shapes first, then specify how the chosen pleat is held and where it releases.
Measured from the waist seamline, A releases at 85 mm and B at 115 mm. In this example, A moves to the next fit review.
In this guide
What Are the Main Types of Pleats for Skirts?
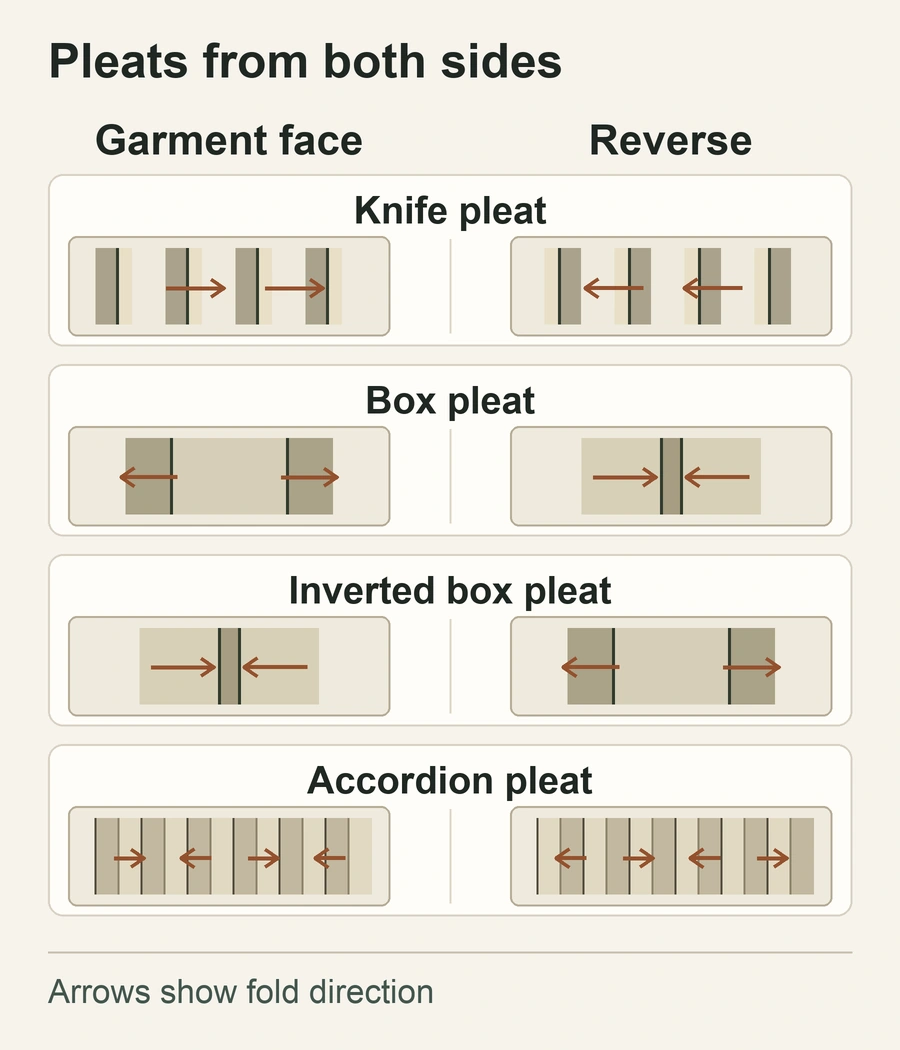
A pleat folds extra fabric into a shorter finished width. The direction of the folds, their depth and the length held by stitching determine where that fullness sits. On a skirt, several folds can distribute it around the waist and hem, or one fold can give a specific area room to open. Always identify the garment face when you give a supplier a pleat drawing. A construction viewed from the reverse can read differently even though the folds belong to the same piece.
Knife and Accordion Pleats
Knife pleats repeat in one direction on the face. The visible edge of each fold covers part of the fabric tucked below it. Specify which direction the edges face as well as where the run starts and ends. On a skirt with a side closure or pocket, check the last fold next to that feature. A shift of the starting point can change how evenly the repeats meet a seam or leave a fold in the way of an opening.
Accordion pleats produce a finer repeated ridge and valley. Compare the swatch hanging vertically and spread out at the hem. Note how the folds are formed and what the maker proposes to do to hold them through the agreed care. If the lines are meant to fan wider toward the bottom, call out a sunray layout and request a swatch that shows the intended flare. A kick pleat has a more localized job, such as opening near the bottom of a narrow skirt to make walking easier. Dresspatternmaking’s garment pleat guide.
Box and Inverted Box Pleats
Read these two from the face. The folds of a box pleat turn outward, leaving a flat visible section between them. On an inverted box pleat, the visible folds meet or face inward at the center, with the extra fabric carried behind. The exact underfold overlap depends on the pattern. Show the intended meeting line from the face and draw the underfolds on the reverse. Drawing both views gives the sample maker enough information to place the fullness even if the team uses different names for the folds. By Hand London’s illustrated pleat guide.
HC-S17 Worked Example and Blank Approval Worksheet
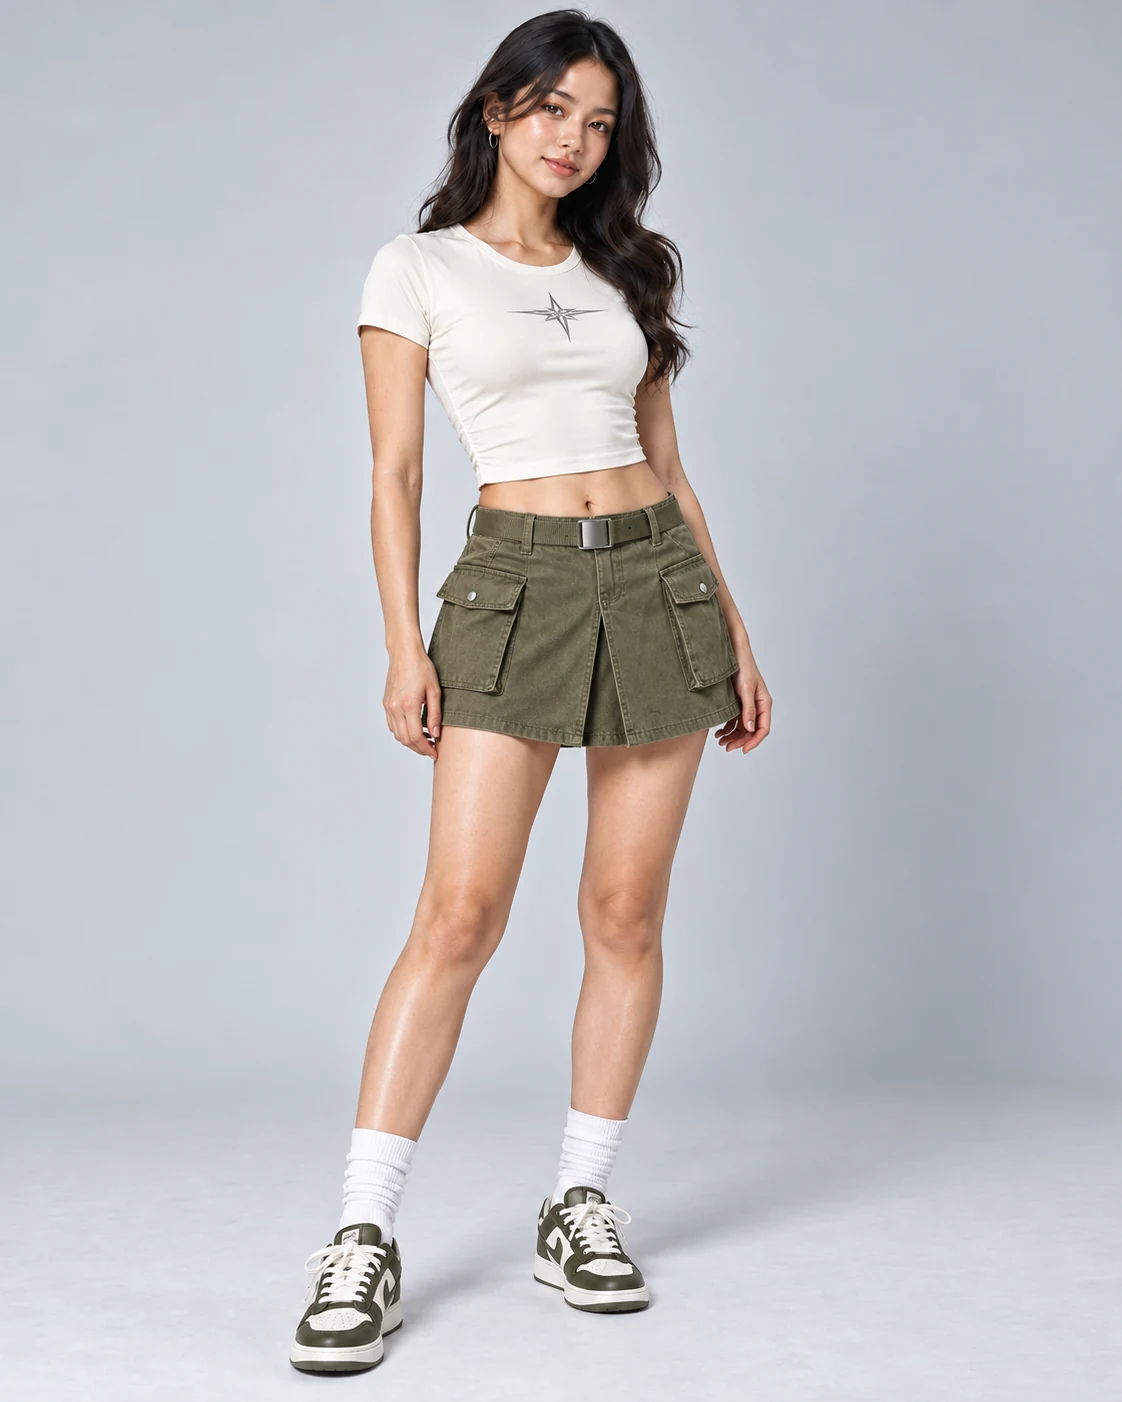
The HC-S17 olive cargo skirt concept combines a front inverted pleat with a webbing belt and cargo pockets. The entries below illustrate a development review. All measurements and observations in the example are hypothetical. Use them to see how to write a request and a decision, then enter the values from your own pattern and sample.
| Field | Illustrative HC-S17 entry |
|---|---|
| Pleat specification | Center-front inverted box pleat. Measure both release positions down from the waist seamline. Keep the folds, underlay, pocket position and belt setting consistent. |
| A/B movement check | A releases at 85 mm and opens earlier during a stride. B releases at 115 mm and sits flatter at rest, but pulls at the end of the stitching when seated. |
| Decision | Carry A into the next full fit and care review. Keep bulk approval open until the brand checks the chosen construction and its finished appearance. |
Use Pleat specification to define the fold and the measurement origin. In A-B fit and movement, give each sample an ID, capture the same checks in both columns and record any condition that changed. Use Sign-off to approve a revision or request another check. Put the same sample IDs on the physical tags, comparison photos and approval record so your supplier can follow the decision.
Download the blank pleat sample approval Excel template
How to Choose a Pleat for the Silhouette and Movement
Start with what the skirt needs to do on the body. Decide whether the front must look relatively flat at rest, the whole hem should move in repeated folds, or the design needs room in a specific area. Then hold a folded swatch at the relevant part of the pattern. Look at the folded thickness along the waist and where the folds pass close to a pocket. The result depends on the amount and location of the folded fabric as well as on the shell and any layers behind it.
| Pleat type | Where to use it | What to check on the sample |
|---|---|---|
| Knife | A directional repeat on a panel or around the skirt. | Repeat spacing, the last fold at the seam and clearance at the pocket. |
| Box | A defined, visible panel in one area or repeated around the skirt. | Balanced folded edges and the thickness beneath the waistband. |
| Inverted box | Fullness carried behind folds that face each other. | Center-front alignment, opening under movement and return to the intended resting position. |
| Accordion | A fine repeat across a panel or full skirt. | Even fold rhythm, edge finish and how the folds hold after care. |
A fabric swatch can explain how the folds look, while a sewn skirt shows how they move near the waist, hips and pockets. If the skirt includes a lining, include it in the final movement check. A lining with less room than the shell can change the result even when the pleat is cut correctly. Once the brand has chosen the fold arrangement, use the pleated skirt fabric calculation guide to work through fabric intake and compare layout quotes on that specific pattern.
If the choice is still open, ask for two folded samples cut from the same proposed shell. Mark the visible fold edges on the reverse and photograph how the cloth opens when you move the free edge. Compare the layers at the waistband, the silhouette below the hip and the resting fold. This gives the supplier a clear reference when a sketch shows the front shape but leaves the amount of hidden fullness open.
What to Put in the Skirt Tech Pack
Draw the Fold, Placement and Release Point
Send a front sketch, a reverse detail and a marked pattern section. Identify center front, the fold lines, the lines the folds are brought to and the reference line for each measurement. Write the depth and units for each side and show where the measurements apply. Mark the finished waist seamline separately from the cut edge or top of the waistband. That lets the pattern maker and the sample reviewer measure from the same place.
For a partly stitched fold, mark the release point where the held section ends and the pleat can open. On HC-S17, the example measures straight down along center front from the finished waist seamline. Indicate whether the stitching is visible on the face and what should hold the folds above that point. Call out the finish, pressing direction, underlay edge and how the folded layers are caught at the hem if those details affect the look. Add the drawing and revision to the clothing tech pack so changes stay traceable.
Give the drawing a second annotation for the expected face at rest. A supplier can hit the selected measurement and still have a visibly shifted fold if the two sides are placed differently. Identify whether the edges should meet, overlap or sit apart at the reference point. Ask for the same front and reverse views with the first sample so the team can distinguish a measurement difference from a fold placement difference.
Check Waistband, Belt and Pocket Clearance
Set the skirt on the body at its intended waist position before judging where the pleat sits. The same skirt can hang differently if the belt is tightened further. Record the belt setting or how it was fitted, along with waist and hip measurements and the intended ease. Confirm the pocket mouth and flap clear the folded area when empty and when used as intended. Mark the clearance and any layers that should stay free of the pleat.
Tell the supplier how the release point and pocket position should be handled when the pattern is graded. Ask for measurements from the same datum across the sizes the brand needs to review. A measurement that stays fixed across sizes is a decision, just as grading that point is a decision. Confirm which part of the skirt carries the movement room and avoid asking a deeper pleat to compensate for unresolved fit above the release point. The product development and sampling guide outlines how to carry an approved change into another sample.
Compare Two Release Points on Matching Fit Samples
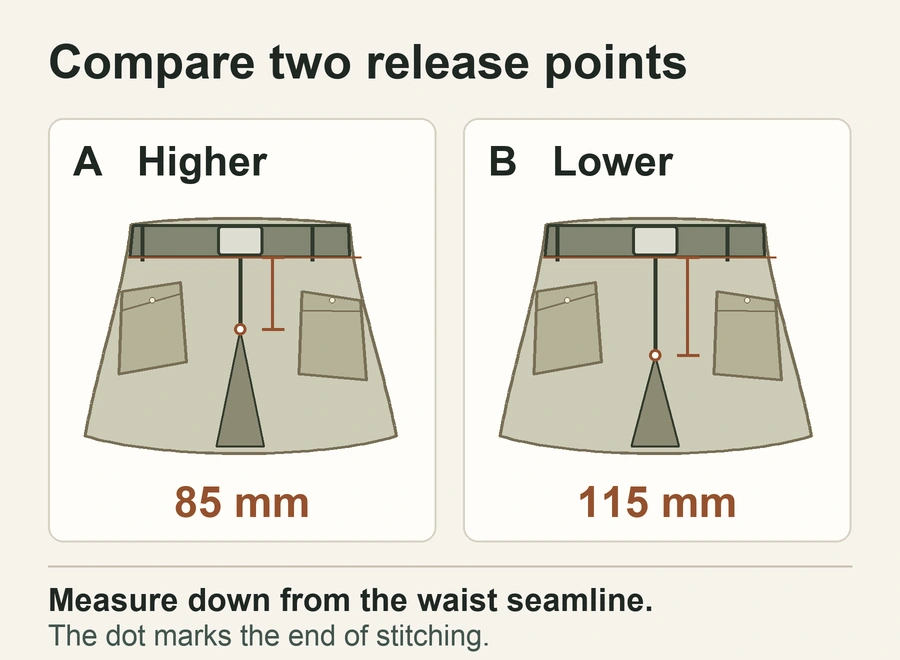
Use the same shell article and lot, underlay, lining if specified, pleat depth, size, seam construction and trims. Hold the waist and hip ease, pocket placement and belt setting consistent. Record the finished distance to the release point on each physical sample. If the samples differ elsewhere, record it before interpreting the results and request a matched pair when that difference could affect movement. A sewn swatch is useful for checking the fold itself. Walking and sitting need the full skirt.
Begin with the pockets empty and the wearer standing naturally. Photograph the front and side at the same distance and mark where the folds sit relative to the center line. Have the wearer take the same steps and sit on the same seat in each skirt. Ask where any pull begins, look at the end of the stitching and compare how high the front hem moves. After the wearer stands again and the fabric settles, check where the folds return. If the brief calls for pocket use while moving, repeat both trials with the same agreed pocket contents.
A higher opening gives the fold room to spread sooner in the garment. A lower one keeps more of the front held closed. Judge the trade-off on the actual samples. Record any change in pocket access or hem hang and note whether the fold opens because the garment is moving or because there is already tension across the hips at rest. If both samples pull above the opening, solve that shared fit problem before approving either stop point.
Photograph the skirt again after the agreed care and rest period. Record what the care process was and what pressing took place before the pictures. Repeat the same views and movement checks on both samples. A close-up of the end of the stitching helps a reviewer locate a change, and a wider view shows whether the skirt still hangs as intended. Agree in advance what should happen if the pleat looks acceptable standing but restricts sitting.
Record who tried on the skirt and the size on the sample tag, without putting personal details into the shared workbook. Keep the order and pace of the movement checks consistent. If the result varies across repeated trials, write down the condition that changed, such as a different belt setting. Give the fit reviewer enough information to reproduce the check before changing the pattern again.
Approve the Sample and Prepare the RFQ
Write the decision in terms of the sample and the stage it has reached. Record the approved or held revision, the release measurement and datum, the fabric and trim IDs, the pictures reviewed and the checks that remain open. If the selected release point can move forward to a fit review, state that next step. When the brand approves the final sample, confirm whether the same construction and materials are what the supplier is quoting.
Combine the sign-off with the updated flat, pattern and size requirements. Specify which size has been checked and which sizes still need confirmation. If the supplier proposes a different fabric, lining, belt or pocket construction, have the team agree which appearance and movement checks to repeat before using that option. The garment quality control checklist covers the other inspection points beyond this pleat detail.
When comparing quotes, tie each response to the release position and material references in the same request. Ask the supplier to identify the construction or finishing operation on which its price is based. A quote using a different fabric, lining or holding method should identify that option separately. Keep its fit and care review open until the proposed materials and construction have been seen together on the sample.
For a quote or a revised sample request, send the style reference, current revision, the option to price and the planned color and size quantities. Keep an open fit or care item visible alongside that request. From the women’s skirt development gallery, select HC-S17 and open its style inquiry. If the review notes are already ready, you can also open the HC-S17 inquiry form.
Frequently Asked Questions
How can I tell a box pleat from an inverted box pleat on a flat sketch?
Start with the garment face. A box pleat has a flat center section framed by folds that face outward. In an inverted box pleat, the visible folds face toward the center, with the fullness folded behind them. Ask for arrows on the face sketch and a matching reverse detail to confirm the construction.
Where should I measure the release point of a center-front pleat?
Choose a fixed reference that the pattern maker and sample reviewer can both locate. For the HC-S17 example, measure down center front from the finished waist seamline to the end of the stitched-down section. State whether the measurement follows a seam or a straight vertical line, then use that method on both versions.
Why does an inverted pleat open when the wearer is standing still?
Check waist and hip ease, the belt setting and how the skirt hangs. A pull across the hips may open the fold even before the wearer moves. Also check the alignment of the underfolds, nearby pocket layers and any lining. Review the skirt without a loaded pocket first, then compare again in its intended use.
When should a different fabric or size trigger another movement review?
Repeat the affected checks when a change can alter the way the pleat hangs, opens or returns at rest. A stiffer fabric or a revised lining can change how the folded layers move. In a new size, compare waist and hip ease, the release point and pocket clearance before carrying over the earlier approval.