Fit comparison · Style HC-S10
Boxy Fit vs. Oversized T-Shirts for Womenswear Brands
A boxy tee has a broad, straight outline. An oversized tee has extra room. Use HC-S10 to compare body length at the same chest width and plan a print placement check.
- Shared flat chest target
- 59.0 cm
- Sample A body length
- 64.0 cm
- Sample B body length
- 70.0 cm
Use the workbook to compare samples, review artwork across sizes, and record decisions.
In this guide
Boxy Fit vs. Oversized T-Shirts
A boxy T-shirt has a broad, fairly straight body in relation to its length. An oversized T-shirt is intentionally roomy. It can be broad and short, broad and long, or loose mainly through the chest and sleeves. A tee can be both boxy and oversized. When you ask a factory to make one, show the proportions you want rather than relying on the fit name alone.
Read the Shape From the Front and Side
Look at the position of the shoulder seam, the width through the chest and hem, and where the body ends on the wearer. A shorter, wider body can read as boxy without showing the waist. A long tee with the same chest width can look more elongated when worn. A relaxed shoulder can support either shape, so describe the intended sleeve length and the shoulder position separately.
| Fit direction | Visual cue | What to tell the factory |
|---|---|---|
| Boxy | Broad body with a straighter outline relative to its length | Chest and hem widths, body length, and desired side profile |
| Oversized | Extra room and an intentionally relaxed fit | Where to add room and where the hem and sleeve should end |
| Boxy and oversized | A broad outline with extra room on the wearer | Fit reference, body measurements, and finished garment targets |
Compare the intended fit with a garment the team can measure. Use photographs to describe the silhouette and a technical flat to show the measuring landmarks. If the design team wants a square shape while the buyer wants more length, record both priorities before asking for the first sample. The T-shirt manufacturing page shows how to prepare the wider style and quote brief.
Use the HC-S10 Example to Brief Two Fit Samples
Compare Length at the Same Chest Width
Start with the use the tee has in the range. A graphic style sold to sit over high-rise bottoms may need a different hem position from a layering tee intended to cover the waistband. Show the supplier the type of bottoms and the front and back coverage you expect. Note whether the fit will be reviewed on one fit model or on different body shapes, and keep the first A/B comparison on the same wearer.
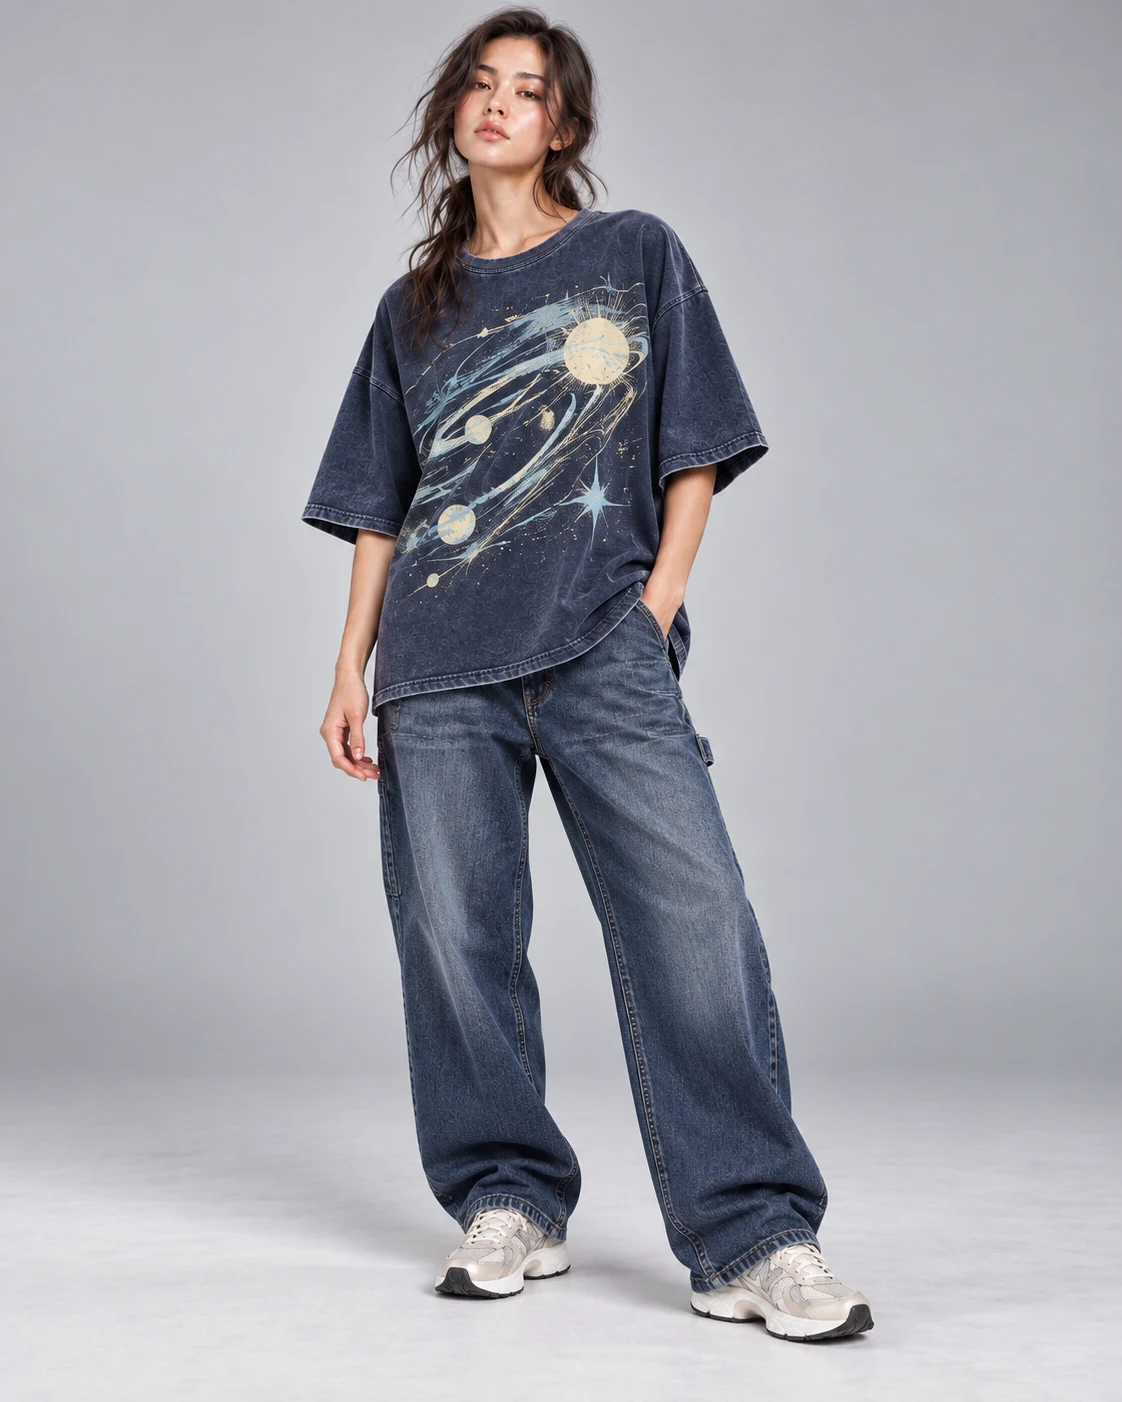
HC-S10 shows a faded navy T-shirt with a loose rectangular body, dropped shoulder line, wide sleeves, and a large graphic. The example starts at a 59.0 cm flat chest width. Sample A uses a 64.0 cm body length and Sample B uses 70.0 cm. These figures are illustrative targets for one named size. They give a buyer a way to ask whether the extra length changes the balance of the body and graphic while keeping the width target visible.
Keep the proposed chest, hem width, shoulder, sleeve and fabric consistent for both samples when practical. If the supplier has to change more than length, ask it to record the differences against the sample IDs. Then compare the finished garments on the same fit model, with the same bottoms and photographs taken from the same angles. Check whether the intended hem position works while standing, sitting and raising the arms.
Give Each Sample a Separate Review Question
Before the fitting, photograph both samples laid flat against the same backdrop. Include the sample ID and revision in the photograph and keep the camera position consistent. Then take matched front and side photos on the wearer. A flat photo shows the hem line and artwork spacing, while a worn photo helps explain where the tee sits relative to the waistband. Keep both views with the measurement sheet so a second reviewer can trace the decision.
For the shorter version, check whether the hem sits where the range needs it and whether it moves too high when worn. For the longer version, check whether the hem makes the intended broad silhouette look more elongated or makes the bottom of the graphic sit too low. Record the answer alongside the actual finished measurements. A sample that misses its target should be identified before the team attributes the appearance to the proposed length.
The blank worksheet at the top gives each option a column for proposed and measured values, plus a place for the decision. Use the T-shirt tech pack example to assemble the full style documents around that comparison. The sampling capability page explains how to state the purpose of a sample and carry review decisions to the next round.
Compare two fit samples, review artwork across sizes, and record the quote decision.
Define the Measurements That Shape a Boxy Tee
Set Chest, Hem and Body-Length Landmarks
Measure a relaxed finished garment on a flat surface. Mark the agreed chest line and record where it sits relative to the armhole. Measure once across the garment and call the result a flat width. At the hem, measure the finished edge from side to side. Define the body-length start point, such as the high shoulder point, and show its path to the finished hem on the technical flat. Confirm whether the measurement is taken before or after the garment finish.
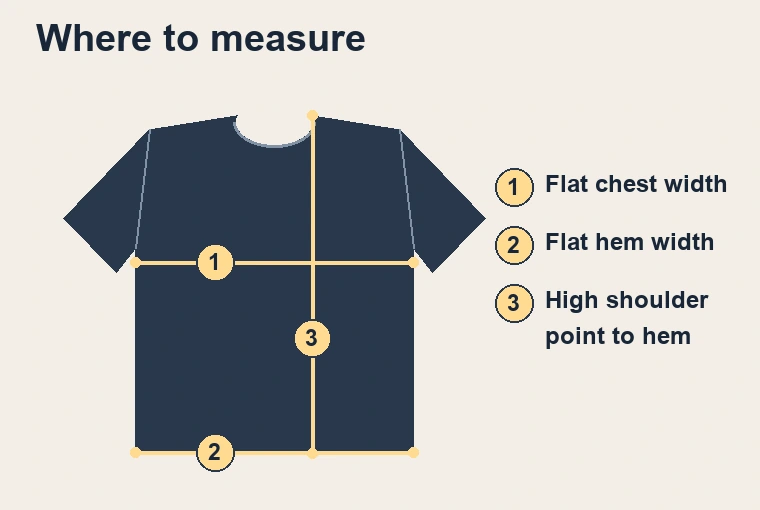
Check how the side seam runs from the chest to the hem. If the style looks broad at the chest and narrow at the bottom, record whether that shape belongs in the brief. A curved or tapered seam may be intentional, and it affects how the graphic hangs when worn. Ask for the actual chest and hem readings alongside the body length before revising the pattern. Use separate fields for the target, tolerance, and measured result.
Check that the same landmark is used on the approved reference, the supplier’s sample sheet, and the next pattern revision. A length recorded from the center back neck can describe a different path from the one recorded at the high shoulder. If a supplier uses another convention, ask it to mark both paths once so everyone can reconcile the values. Write the unit and measurement stage at the top of the sheet.
Record Shoulder Position and Sleeve Reach
Identify where the sleeve joins the body. On a dropped shoulder, the sleeve seam sits farther from the neck than it does on a more conventional fit. A sleeve measurement taken from the shoulder seam can stay the same even when the seam shifts outward. Specify the starting point and note where you want the sleeve edge to land on the wearer. Record sleeve width and finished opening alongside sleeve length if they affect mobility or the outline.
For a range with several sizes, ask the pattern team to show how it intends to grade chest, hem, body length and shoulder together. Review a size near each end of the range when the balance is important. The intended difference between a wide and a long tee can become less visible if the size increments change the proportions. A documented point of measure lets the team review the result consistently. CLO-SET’s tech pack documentation shows how a measurement section can record garment points of measure.
Check Artwork Placement on the Actual Fit
Use One Artwork Reference and Compare Its Visual Scale
Give the artwork a file ID and revision. Specify the width and height of the agreed artwork box and define the printed edges included in it. Use fixed landmarks to mark center alignment and the distance from the neck seam. Record the clearance to the side seams and the hem where those boundaries affect the design. On a wider body, the same artwork can leave more space at the sides even when the artwork file and print dimensions stay the same.
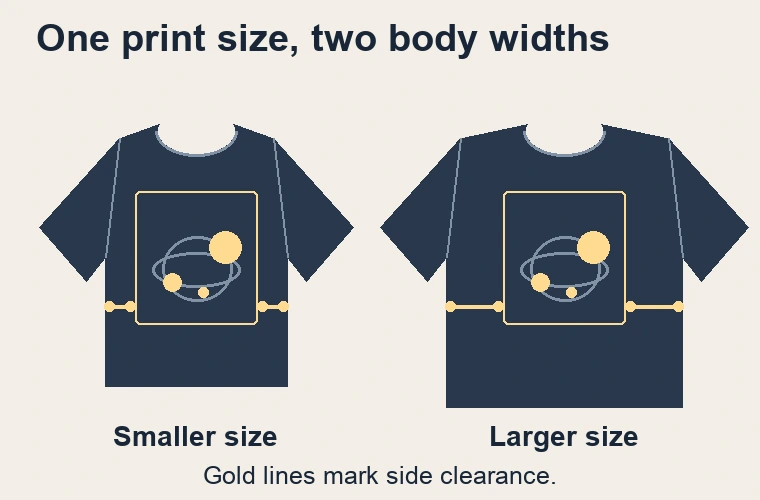
Check the print against the space available at its actual height. A chest width taken below the armhole may sit above or below the widest part of the graphic. Measure the usable panel where the print approaches the side seam, and note the closest distance if the artwork is angled. For an asymmetric layout, record the left and right clearances separately. Save the flat mockup alongside the artwork file so the intended offset survives the next revision.
Look at the graphic on the worn garment as well as the flat. A dropped shoulder and the way the fabric falls can move parts of the print into a fold. Ask for a front view with arms relaxed, then check the portion of the art that stays visible when the wearer moves. Record whether the issue comes from print placement, garment proportions, or the fit model position before asking for an artwork change.
Decide Whether All Sizes Use One Print Size
Before approving a print setup, ask for a placement proof at the intended output size. Check the visible bounding box on the proof and record whether its edges include isolated details, such as a small star outside the main graphic. If a production method requires a minimum clearance, have the supplier state it for the selected garment and artwork. Keep that value with the signed reference so it can be checked again when the artwork or size range changes.
Ask the supplier to show the smallest intended size with the proposed graphic. Check whether the artwork fits inside the available front area with the intended clearance. Check a larger size to see whether the same artwork has the visual presence you want. If two print sizes are proposed, name the sizes they apply to and ask how the change affects setup, approvals and price. Use the printing and embroidery guide to compare decoration methods where needed.
Swipe or scroll to compare the review points.
| Review point | Record on the sample | Decision for the next revision |
|---|---|---|
| Body proportions | Actual chest, hem and length | Confirm the intended width and length together |
| Shoulder and sleeve | Seam position and sleeve edge on the wearer | Revise the shoulder and sleeve with clear landmarks |
| Graphic balance | Art dimensions and clearances on reviewed sizes | Approve the print size and its size allocation |
Send the Approved Fit and Artwork for Quoting
Identify What the Supplier Should Price
Send one dated revision, the proposed size and color split, and the physical sample or measurement reference. Ask each supplier to identify the fabric reference, garment finish, artwork setup, and sample scope included in its quote. Keep alternate fabric or print configurations on separate lines. For example, a second print size can have a different setup or approval step. A quote can then be compared against the same garment and print decision.
Record the fit and artwork decisions separately on the approval sheet. A buyer can approve the body proportions and still request a change to the graphic. Identify the reviewer and date, specify which revision has approval, and leave unresolved items open. If a sample mixes an approved fit with an older artwork revision, label that explicitly before it is used as the quote reference.
Where a fit depends on the fabric drape, record the proposed jersey and sample ID. A different knit or finish can change how the same measurements look when worn. Ask for the target fabric weight and the swatch reference together. CottonWorks describes single and double knit structures and the fabric GSM guide explains how to record the weight field.
Review the Finished Garment Under the Agreed Conditions
Record whether each sample was measured after the production finish, before a separate care check, or after that check. Take the same measurements on the same garment where practical. Look at the side seams, hem, neck and artwork together because a visible change can affect the balance even when a particular width still meets the target. If a laboratory report is needed, agree on the method and limits with the supplier or lab. AATCC TM150 covers dimensional change of garments after home laundering.
Frequently Asked Questions
Can a T-Shirt Be Both Boxy and Oversized?
Yes. Boxy describes the outline and oversized describes the intended room on the wearer. A wide straight tee with extra room can meet both descriptions. Mark the chest and hem widths, body length, and sample size in the brief so the factory can work from the fit you actually want. Ask for an agreed base size before the pattern is graded.
Do Boxy T-Shirts Have to Be Cropped?
A boxy body can finish above the waist or extend lower, depending on the design. Its width and relatively straight outline are what give it that look. Record where the hem should sit on a fit reference and ask for the finished length from an agreed garment point. Check that the sleeve length and shoulder position still balance the shorter body.
Should I Size Up to Create a Boxy Fit?
Sizing up changes the existing size pattern, which can affect the neck, shoulders and sleeves as well as the chest. If the intent is a particular boxy silhouette, specify the desired proportions and review the grade. Ask the pattern team to propose which measurements should change across the range. Use a measured reference tee to show the intended result.
Should I Use the Same Graphic Size on Every Tee?
Start with the intended artwork size and check the smallest and a larger garment in the range. Look at the clearances and how much space the graphic occupies on the front. If you need separate print sizes, document the file revisions, size allocation and quote assumptions. Keep the approved artwork revision with the final sample measurements.
Prepare the HC-S10 T-Shirt Inquiry
Send the Fit and Artwork Decisions Together
Open the T-shirt development gallery and select HC-S10. Include the size and color split, the chest and length targets you are evaluating, the art revision, and the decisions you need the first sample to settle. Paste the key points into the project description and keep the worksheet and drawings available for follow-up. For another style, use the T-shirt project inquiry and describe the fit and artwork you want reviewed.
Choose HC-S10, then select “Prepare an RFQ for this style.”