Print approval · Style HC-S12
Screen Printing on Hoodies: How to Approve a Large Chest Print
Check the space above the pocket, compare two trials on the same fabric, and record what the supplier should quote.
- Art box (W × H)
- 28.0 × 21.0 cm
- Neck seam to art
- 7.0 cm
- Pocket clearance
- 3.0 cm
- Trial references
- HC-S12-A / B
Example status · Care review pending.
In this guide
- Map the Print Area Between the Neckline and Pocket
- Prepare Distressed Artwork for a Screen-Print Trial
- Compare Two Print Trials on the Same Fabric
- Check the Print Before and After the Agreed Care Review
- Approve the Sample and Lock the Quote References
- Frequently Asked Questions
- Prepare Your HC-S12 Hoodie Inquiry
Map the Print Area Between the Neckline and Pocket
Mark Center Front and Define the Measuring Points
Approve a large chest print on a finished hoodie in the intended fabric and base size. Start by laying the garment flat and relaxed. Mark center front from the garment pattern or agreed reference seam. Identify where to measure down from the neckline and where the top pocket seam limits the lower edge of the design. Draw a box around the complete visible artwork, including any isolated specks intended to print. Define its width, height, and centerline so the printer and the buyer can measure the same edges.
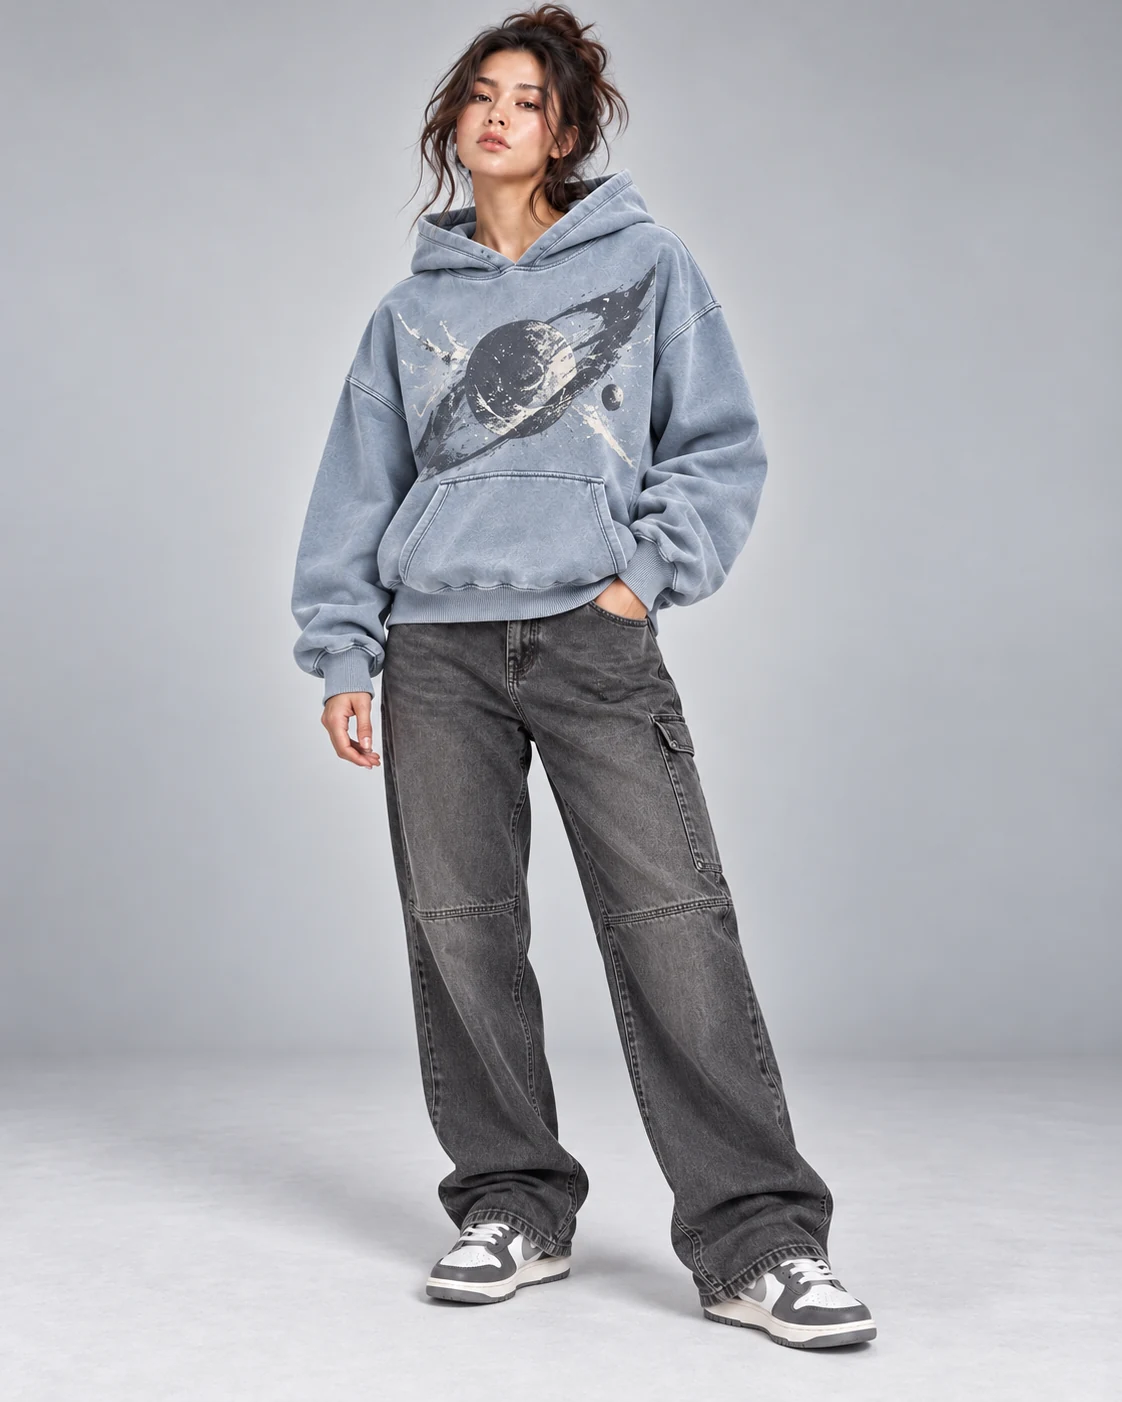
The HC-S12 ice-blue pullover concept uses a large distressed graphic above a kangaroo pocket. In the illustrative size M brief, the proposed art box is 28.0 cm wide by 21.0 cm high. The upper edge sits 7.0 cm below the center-front neck seam, and the closest point of the lower edge leaves 3.0 cm to the top pocket seam. These entries show how to document a layout. Measure your actual sample to set the targets and acceptable variation for your pattern.

Check the Smallest Size Before Ordering Screens
Place the same full-scale artwork on the smallest size and on a larger size in the planned run. Check the closest point to the pocket and side seams, including the edge of any diagonal element. A placement that clears the pocket on the base size can crowd it on a shorter body. Decide whether to retain one artwork size or approve a second layout for selected sizes. Have the supplier identify which sizes each layout and set of screens will serve.
When you compare sizes, use the same approved center-front reference. If the graphic is deliberately off-center, mark the offset and direction on the flat. The visible edge of a distressed design may look uneven, so include the outer boundaries used for measurement on the artwork file. Ask the sample reviewer to confirm the result on the garment with a ruler visible in the reference photo.
Review the design flat and on the intended fit. In a relaxed pullover, folds can hide a small detail or shift where the design appears to sit. Photograph the garment with arms relaxed and the hood in its normal position. Ask the printer how the garment will sit on the platen near the pocket seam. A practical hoodie demonstration shows why seams and pocket bulk deserve their own test. ScreenPrinting.com hoodie demonstration
Prepare Distressed Artwork for a Screen-Print Trial
Mark the Gaps and Fine Details You Want to Retain
A distressed design often uses deliberately broken edges, tiny specks, and patches where the body color shows through. Send an annotated artwork proof that marks which of those details carry the look. Choose a few inspection points. For the HC-S12 direction, useful points could include a narrow gap along the diagonal stroke, the edge of the dark central circle, and the smallest light marks near the shoulder. Ask the printer to flag details that might close up or drop out at finished size.
Mark the garment color that is meant to show through the open areas. On a darker or lighter colorway, the same openings will read differently. If the design is meant to carry across multiple body shades, ask the supplier to show the proposed art on each shade and identify which samples need a physical trial. A single approval can cover several colorways only when the decision record names them and the evidence supports that scope.
Show both the full artwork and enlarged crops of these points. Record any simplified detail in a dated artwork revision and identify the sizes it affects. Ask to see the proposed color separations before the next trial when a change shifts the balance of light and dark areas. Keep the annotated proof with the physical sample so later reviewers can see which breaks were intentional. The hoodie tech pack example shows where to place the artwork file and garment drawing in the full specification.
Give the Printer Fabric and Shade References
Ask the printer to use the intended finished face fabric and colorway. Record the fabric article, lot, fiber composition, surface finish, and garment treatment where confirmed. A digital mockup helps explain the look. A physical swatch shows how the light ink reads on the actual ice-blue ground and whether the print changes how the surface feels.
Where the face contains polyester, ask whether the supplier sees a risk of dye migration or another color change after printing. Ask for a proposed ink and underbase system and a plan to review the specific fabric and colorway. Avient discusses how fabric composition, color, and ink curing affect polyester printing. Keep the printer’s proposed conditions with the sample rather than applying settings from another job. Avient’s polyester printing guidance
Compare Two Print Trials on the Same Fabric
Hold the Artwork and Garment Constant
Give both trials the same artwork revision, finished art box, placement, colorway, fabric lot, and garment size. Request two supplier-proposed print setups for the same design. In the illustrative HC-S12 brief, trial A uses the supplier’s initial underbase proposal and trial B uses a revised underbase proposal. An underbase is the ink layer beneath the visible colors. Record the actual ink references and other changes for each trial. If the supplier adjusts more than the underbase, list each difference so the reviewer can interpret the result.
Give each sample a trial ID and keep a matching blank swatch from the same fabric lot. Use the swatch to compare the unprinted shade if a light ink looks different later. Keep the flat reference and print recipe beside the trial IDs. When you receive photographs, request the same close-up for both samples before asking the printer to adjust the art or the underbase.
Ask the supplier whether the first trials will be on matching cut panels or finished garments. Cut panels can help the team review color, detail, and feel. A finished hoodie is needed to assess the relationship between the graphic, the neckline, and the pocket, as well as the way the large print hangs on the body. Identify the sample stage on the workbook so the buyer can tell what each decision covers.
Compare Opacity, Registration, Edge Detail, and Hand Feel
Put both samples under the same light. Compare how the light areas cover the ground, how the printed colors align where they meet, and whether each designated fine detail is visible. Registration describes the alignment of the printed colors. Inspect the print from a normal viewing distance, then look at the same crops on both samples. Bend the chest lightly as it would move during wear and record how the printed area feels against the surrounding fabric.

Swipe or scroll to compare the review points.
| Check | Where to inspect | Record |
|---|---|---|
| Opacity and shade | The same light area against the same body color | Ground showing through, tint, or uneven coverage |
| Registration | An edge where two colors meet | Visible offset, gap, or an unintended outline |
| Edge detail | One marked broken edge and one fine opening | Whether the designated features remain visible |
| Hand feel and drape | The broad printed area next to the unprinted body | Stiffness, surface feel, and front panel movement |
In a sample workbook entry, A might retain the fine openings but allow more blue to show through the light area. B might improve coverage while feeling firmer across the chest. Mark the preferred direction as pending care review, and name what would change that decision. Record the actual result on identified samples before approving the artwork or print setup. The sampling capability page can help you frame the trial request.
Check the Print Before and After the Agreed Care Review
Distinguish Intentional Texture From New Damage
Photograph both samples before care, after the print has reached the stage agreed with the supplier. Capture the full front and the selected detail points. Repeat the photos from the same distance under the same lighting after the agreed wash and dry process. Compare the results to the annotated proof and the before-care images. Mark any new break, lifted edge, loss of fine detail, color shift, or change in surface feel by location.
Keep an unwashed counterpart if enough trial pieces are available. It gives the buyer a physical reference when photos make the ink look warmer or cooler than it is. Record the elapsed time between printing and the first review, and note when the after-care sample was photographed. Compare both samples at the same stage before deciding whether the appearance difference belongs to the print setup or to the review conditions.
Write down the care conditions, who reviewed the samples, and when the observations were made. If a light area has taken on a tint, record when it first appeared and ask the printer to investigate the fabric and ink combination. If the intended gaps in the art are still visible and new cracks appear nearby, document both. This gives the supplier a place to inspect and a reference for the next revision.
Record Changes in the Print and Garment
Measure the same garment points before and after care. Include the artwork box and the clearance above the pocket if those dimensions affect the layout. A front panel can change shape while the ink remains intact, so keep print appearance and garment dimensions as separate observations. Agree on which checks require lab work and the applicable method and acceptance limits for the order. AATCC TM150 covers garment length and width changes under home laundering. AATCC TM150 scope
Record print placement by size, compare the two trials, and link the approval to the quote.
Approve the Sample and Lock the Quote References
Record the Artwork, Ink Setup, and Physical Sample
Make the approval traceable to a dated garment sample and artwork revision. Include the size allocation, placement references, confirmed body fabric and shade, printer’s ink or underbase record, and agreed care findings. Record who approved each item and what is still open. If the design team approves the look but the care review is pending, record those as two different decisions so the sample remains easy to follow.
Include the stage the quote assumes. A panel trial, a decorated fit sample, and a sample made with the approved production setup answer different questions. Ask the supplier to state which garment will be the reference if the order proceeds. Keep its ID in the approval sheet and on the quote so the team can retrieve it when reviewing a repeat order.
Give suppliers the same artwork, garment size and color split, placements, and sample scope. Ask which part of the quote covers a repeat order using the same approved design and which work would be repeated if the artwork changes. A quote line that says only “chest print” leaves the buyer without enough detail to compare size allocations, screens, or the revision that was priced. Ask each quote to separate preparation or screen charges, sample charges, and per-garment decoration charges where applicable. Have the supplier state which artwork size or sizes the quote covers. Refer to the print and embroidery guide if your team is still deciding which decoration method to sample.
Define Which Changes Need Another Review
A revised fabric lot, ink system, artwork separation, or print position can affect a different part of the decision. Ask the supplier to identify what changed and which comparison should be repeated. If a new placement approaches the pocket seam, approve it on the affected size. If the ink proposal changes, revisit the agreed appearance and care checks. Attach the latest proof and sample reference to the revised quote so the order uses the same version the team reviewed.
Frequently Asked Questions
Can a Chest Print Cross the Pocket Seam?
It can be proposed as a separate construction or printing trial. Ask how the supplier will support the garment at that seam and how it will handle a change in height across the print area. Review the actual intersection for coverage and alignment. If the design can sit above the seam, measure that clearance on the smallest relevant size.
Can One Screen Size Cover the Whole Size Run?
One artwork size can cover multiple garment sizes when the layout and appearance work across the range. Check the smallest size for clearances and review a larger size to see how the graphic reads on the wider front. If you need a second artwork size, record the affected sizes, proof revision, and separate setup assumptions.
How Do I Tell Intentional Distressing From Cracking?
Mark the intentional gaps on the artwork proof and photograph those same areas before and after care. A break visible in the original proof can belong to the design. A new break in a previously solid area should be recorded with the sample ID, location, care stage, and a photo for the printer to review.
What Should I Recheck if the Fabric or Ink Changes?
Ask the supplier to document the new fabric or ink reference and explain which part of the approved result could change. Repeat the relevant checks for shade, coverage, detail, feel, and care. If the fabric also changes how the hoodie hangs, review the print position and pocket clearance on the assembled garment.
Prepare Your HC-S12 Hoodie Inquiry
Send the Print Decision With the Garment Brief
Include the artwork revision, print dimensions and position, proposed fabric reference, trial observations, and planned size and color split. Tell the supplier which items already have approval and what the next sample needs to resolve. Keep the files and physical references ready for follow-up. For a different hoodie concept, send the same inputs through the hoodie project inquiry.
Choose HC-S12, then select “Prepare an RFQ for this style.”