Style HC-S16
How to Fix Seam Puckering in Parachute Pants Before Bulk Production
Seam puckering is unwanted rippling along a sewn seam. Mark where it starts and when it appears. Then compare one change at a time on the curved piping or zip-pocket opening.
Piping trial B moves to a fit sample after a feed adjustment. The zip-pocket construction stays on hold because ripples appear after care.
In this guide
What Is Seam Puckering?
Seam puckering is a row of unwanted waves that gathers the fabric beside a seam. Start with the garment resting flat and relaxed, then put it on the same fit model or form used for the original review. A loose leg naturally makes broad folds that move as the wearer shifts. Fit-related drag lines can run toward the knee, crotch or pocket when the garment is on the body. Repeated short ripples that still trace the stitch line on the relaxed sample are a reason to investigate the sewn seam.
Lay the trousers in the same orientation for each review. Photograph the whole leg, then the seam from the face and reverse. Mark the beginning and end of the affected stretch on a copy of the photo. Check the corresponding area on the other leg, where the construction allows a comparison. A single close-up may show that something looks uneven, but the full-leg view shows whether the same defect changes the hang or shape. Repeat the observation before pressing, after the agreed finish and after the agreed care procedure when those stages apply.
| What you see | First check |
|---|---|
| Short waves follow the curved piping on the relaxed leg. | Compare matching points, layer alignment and how the assembly moves through the machine. |
| Ripples collect at one end of the zip opening. | Open and close the zip. Look at tape alignment and the thickness of the layers at both ends. |
| The seam looks flat before care, then starts to ripple. | Compare measurements and photos at the same points. Check whether the fabric, thread and trims changed differently. |

If the waves look different each time the trousers are handled, add a second set of photos with the leg supported from the waistband. For a zipper complaint, capture the opening in the same position on both sides. A pocket that looks flat while open might bow when closed. Send both views, along with the full front view, so the sample maker can see how the tape, pocket bag and leg relate to one another.
HC-S16 Worked Example and Free Excel Template
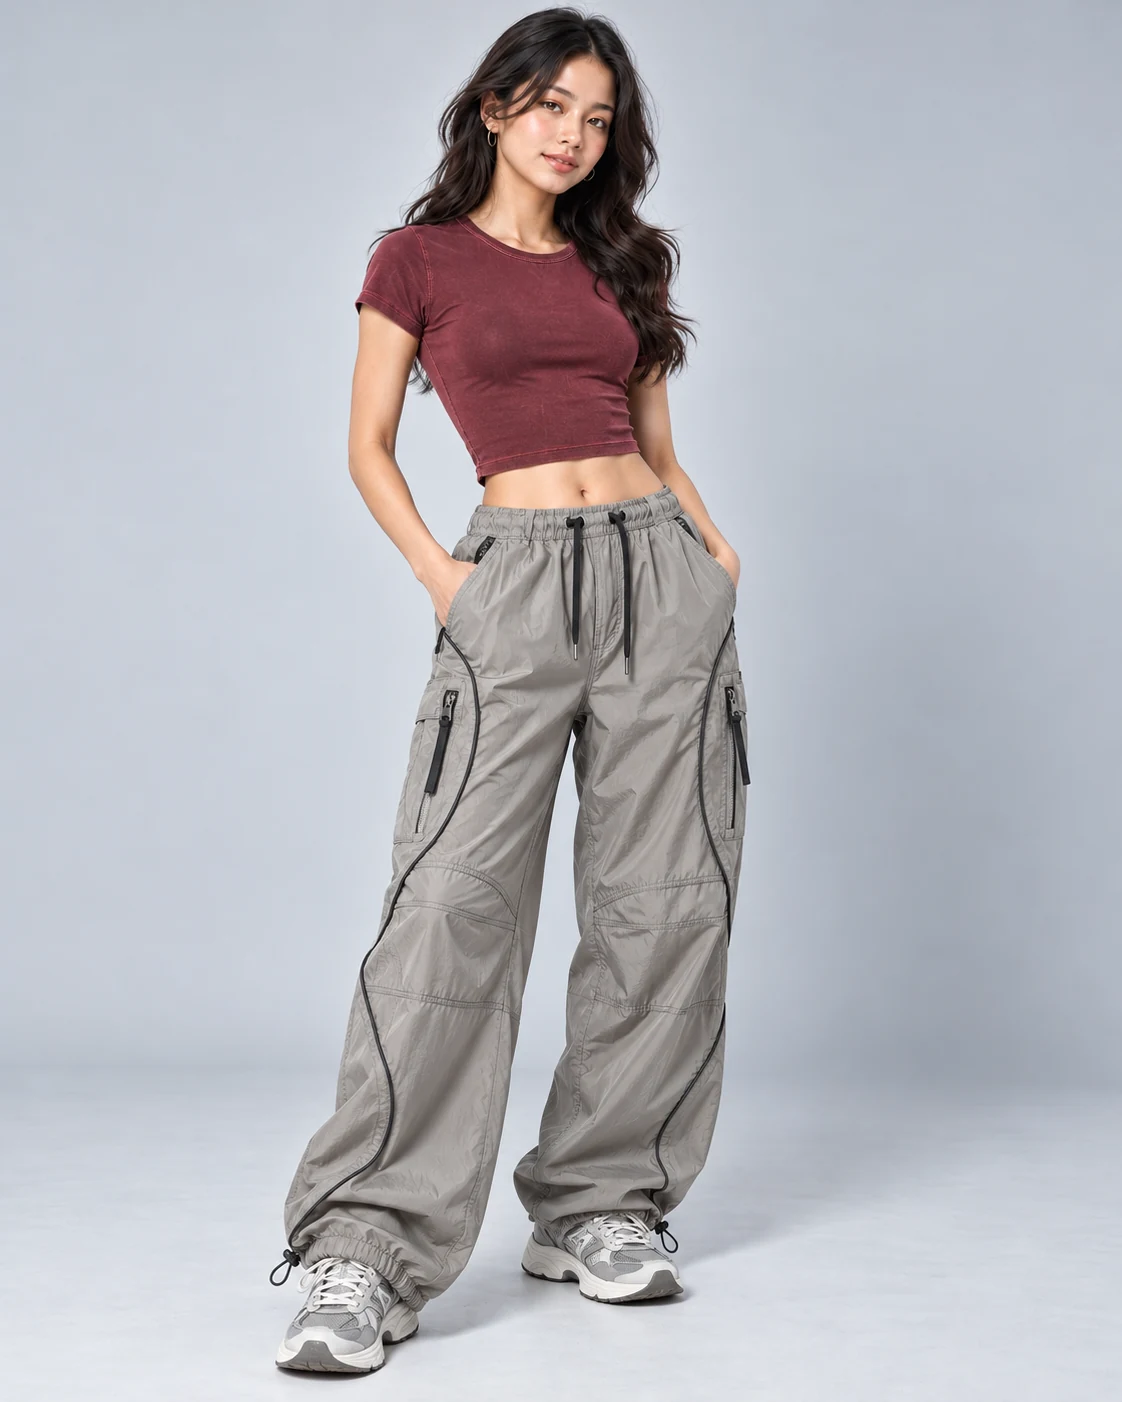
HC-S16 is the design reference for a stone parachute trouser with curved dark piping and zipped cargo pockets. The entries below show how a brand might document its review. They are illustrative, with made-up trial IDs and observations. Use your own fabric, trim and fit references when you fill out the sheet.
| Field | Illustrative HC-S16 entry |
|---|---|
| Defect location | D01. Left outer leg, between the two marks at the knee curve. Short waves visible immediately after sewing. |
| A/B trial | P-A uses the baseline feed setup. P-B uses the sample maker’s revised feed setup. Both use the same pattern, shell, piping, thread and stitch specification. P-B shows fewer waves and an even piping width in the agreed views. |
| Sign-off and open item | Move P-B to the full fit sample. Keep the zip opening on hold under D02 because ripples appear after care. Request a separate pocket trial and repeat the zipper function check before bulk sign-off. |
The workbook gives you a Defect map to tie each observation to a location and photo, A-B trials to record the baseline and revision side by side, and Sign-off to document the accepted build or open action. Keep the same defect ID from the photo through to the decision. If the supplier sends a new sample, give the new check its own revision and keep the earlier record for comparison.
Download the blank seam puckering Excel template
Start the record with the physical sample tag. Give each comparison photo a reference that includes the zone and sample version. A supplier can then reproduce the request from the tag and pictures instead of guessing which leg or seam you meant. If the same issue appears on both legs, note where it is stronger. If the garment has already been pressed or washed, record that state before asking the supplier to interpret the first set of photos.
Why Seams Pucker and What to Check First
Uneven Feeding and Layer Alignment
The two fabric plies and the piping can travel through the machine at different rates. One layer can gather while another stays smooth. On a curve, also check that the pattern pieces were cut accurately, the alignment marks met at the stitch line and the sample maker kept the intended seam allowance. A panel length or alignment issue can look like a feed problem after stitching.
Ask the supplier to examine a spare sewn trial from the same material. Comparing the released plies around a puckered stretch can help identify uneven feeding, provided the marked pieces were intended to match there. If the pieces align before sewing and shift during assembly, document where the shift begins and ask the sample maker to try a feed adjustment. Keep the accepted fit sample intact as a reference. Coats seam puckering guide.
Thread Tension and Fabric Yarn Displacement
Excessive thread tension during sewing can draw the seam together as the thread relaxes. Separately, in a tightly woven cloth, the inserted sewing thread can displace the fabric yarns around the stitch line and produce similar waves. Needle choice, thread size and stitch formation can affect the appearance. Ask for the supplier’s baseline details and a repeatable proposed adjustment. A dial number by itself only describes one setup.
On a spare piece, the sample maker can release a short run of stitches and note whether the ripples ease. Improvement may support a tension explanation. Waves that remain can justify investigating the fabric structure and stitching. Several causes can coexist, so follow the diagnostic check with a complete sewn comparison and review the resulting stitch quality. AMANN seam puckering reference.
Different Shrinkage Across Fabric and Trims
Look at the shell, piping, zipper tape, pocket facing and any stay tape or backing as a seam assembly. Components can change differently during finishing or care. If ripples appear along a previously flat zipper, compare the distance between the same two marked points and check the neighboring fabric and trims. A change only after care is a clue. Earlier tension or feeding issues can also become more visible after finishing.
Agree how to care for, dry and rest both versions before looking at them side by side. Ask for separate confirmation of any lab method or acceptance threshold the brand needs. A sample room observation can direct the next trial while the brand agrees the formal requirement. American & Efird technical bulletin (PDF).
How to Compare Two Sewn Trials
Run a separate A/B pair for each open decision. Label the baseline A and the revision B. Use the same shell article and lot, pattern revision, size and unaffected trims. Keep cutting direction, viewing conditions, finishing and care consistent. Have the sample maker write the one planned change in the record before sewing. If several settings must move together for a workable stitch, record the combination and treat it as one proposed setup. That result compares the two setups as a whole.

Trial 1 — Curved Piping on the Leg Panel
Ask for a sewn piece that reproduces the actual curve and layer order. A straight strip is suitable for an initial stitch check, but it leaves out the shape where the trouble starts. Mark the same points through the curve on both pieces. Compare how the dark piping follows the shape, whether its visible width stays even and whether the shell gathers inside or outside the curve. Photograph the reverse as well as the face.
If the first pair points to feeding, have the sample maker capture the setup difference and check that the revision keeps a balanced stitch. Consider a different piping construction as a separate comparison if the present stack remains too bulky. When a trial improves the detail, repeat it in a full garment. Check the leg from the side and during a knee bend. A segment that lies flat on the table may pull when the whole leg is worn. The product development and sampling guide describes the sampling handoff.
Before sewing the full garment, confirm what the trial piece represents. For example, if the piping crosses a knee panel join on the garment, the trial should include that join and its layer transition. Otherwise the sample maker may get a smooth curve on the trial and see the waves return at the thicker section. Mark this junction as a separate check on the fit sample and review it on both legs.
Trial 2 — Zipped Cargo Pocket Opening
Sew the full opening, including tape, facing, pocket bag and both ends. Keep the same zipper article and opening length when evaluating a change to the pocket assembly. If the intended comparison is a different zipper or tape, hold the pocket construction constant and record the exact substitution. Check the tape from the reverse, the transition at each end and whether the slider clears the opening without catching.
Review both versions zipped and unzipped, first with the pocket empty and then with the agreed item if load is part of the brief. Look for bowing at the opening and any pull transferred to the leg. Compare the same checks after care. If the pocket looks good flat but distorts when worn, review position, ease and the pocket bag before assuming a machine adjustment will solve it. Refer to the cargo pants fabric and pocket guide if you are still comparing body fabric options.
What to Approve Before Bulk Production
Check Appearance and Zipper Function Before and After Care
Define approval using the views and conditions the brand will actually review. Agree how smooth the piping should appear, where any visible easing is acceptable, and how the pocket should open and sit in use. Pair a close-up of each zone with a full-leg image. Use the same light, pose and zipper state each time. Record the care process and whether the sample was pressed again before the photo. If the sample passed one view but failed another, enter both outcomes and hold the affected construction for review.
Check the final fit sample with the proposed shell, piping and zipper together. If any approval depends on a certain tape or backing, put its reference on the sign-off. Use the garment quality control checklist to connect those focused seam checks to the broader review.
Keep the accepted sample and labeled pictures available to the people reviewing the next version. If a supplier sends a new color or fabric lot for review, check the same marked areas and record what has changed since approval. The buyer and supplier can then agree whether the earlier evidence still covers the proposed build or whether the affected seam needs another check.
Record the Decision in the Tech Pack and RFQ
Approve, hold or request a new trial for each affected zone. Record the sample version, the photos showing the agreed appearance, the selected component references, who reviewed it and the next action. A result that qualifies a detail for a new fit sample belongs at that stage. Set bulk approval after the complete garment and the open points have been reviewed. When a trim changes, record whether it changes the approved construction and which checks must be repeated.
If a proposed correction can affect cost or appearance, identify it by name in the request. Adding a supporting layer at the zip opening, for example, changes what is being priced and may alter how the pocket bends. Ask each supplier to identify the actual materials and operations included in its version, and to list any proposed substitution against the same revision. Attach the review photos next to the request so the supplier can see why the change matters.
Carry the decision into the cargo pants tech pack. For a quotation, send the style, quantity by color and size, the current pattern and construction references, and the specific option or options to price. If a pocket version is still on hold, show the open step alongside the version you want quoted. Start at the women’s trousers development gallery, select HC-S16, and use its style inquiry. If you already have the comparison sheet ready, you can also open the HC-S16 inquiry form.
Frequently Asked Questions
Can pressing hide seam puckering during sample review?
Pressing can temporarily improve how a seam looks. Photograph the marked zone before pressing if possible, then check again after the finish and the agreed care procedure. Ask the supplier to record when the waves appeared and when the images were taken. If the seam only looks smooth immediately after pressing, keep the correction open until the agreed review is complete.
Why does a zipper pocket lie flat before care and ripple afterward?
The shell, backing, zipper tape and sewing thread may respond differently to the care process. Earlier stitching tension may also show up more clearly afterward. Compare the same marked area and measure between the same points before and after care. Check zipper movement as well as appearance, and use a separate trial to see whether one specified change improves both.
Should we change the fabric or adjust the sewing setup first?
Start with the simplest comparison that tests the suspected cause. If layers were shifting during assembly, keep the fabric and ask for a controlled setup change. If the fabric still distorts around the stitches on a spare trial, explore the thread and fabric combination. Record each comparison separately so the buyer can see what drove the outcome.
When does a trim substitution need a new sewn trial?
Request a new trial when the alternative changes how the approved detail is assembled or how it behaves, such as a zipper tape with a different feel or a thicker piping. Name the original and proposed articles, then repeat the relevant appearance, use and care checks. Record which version the approval covers before handing the brief back for quotation or production review.