Style HC-S23
What Is a Placket? How to Specify One for a Zip Polo
A placket finishes an opening in a garment. On a zip Polo, it frames the zipper and joins the collar to the front. Use HC-S23 to measure the opening, specify the zipper and compare two ways to support the knit.
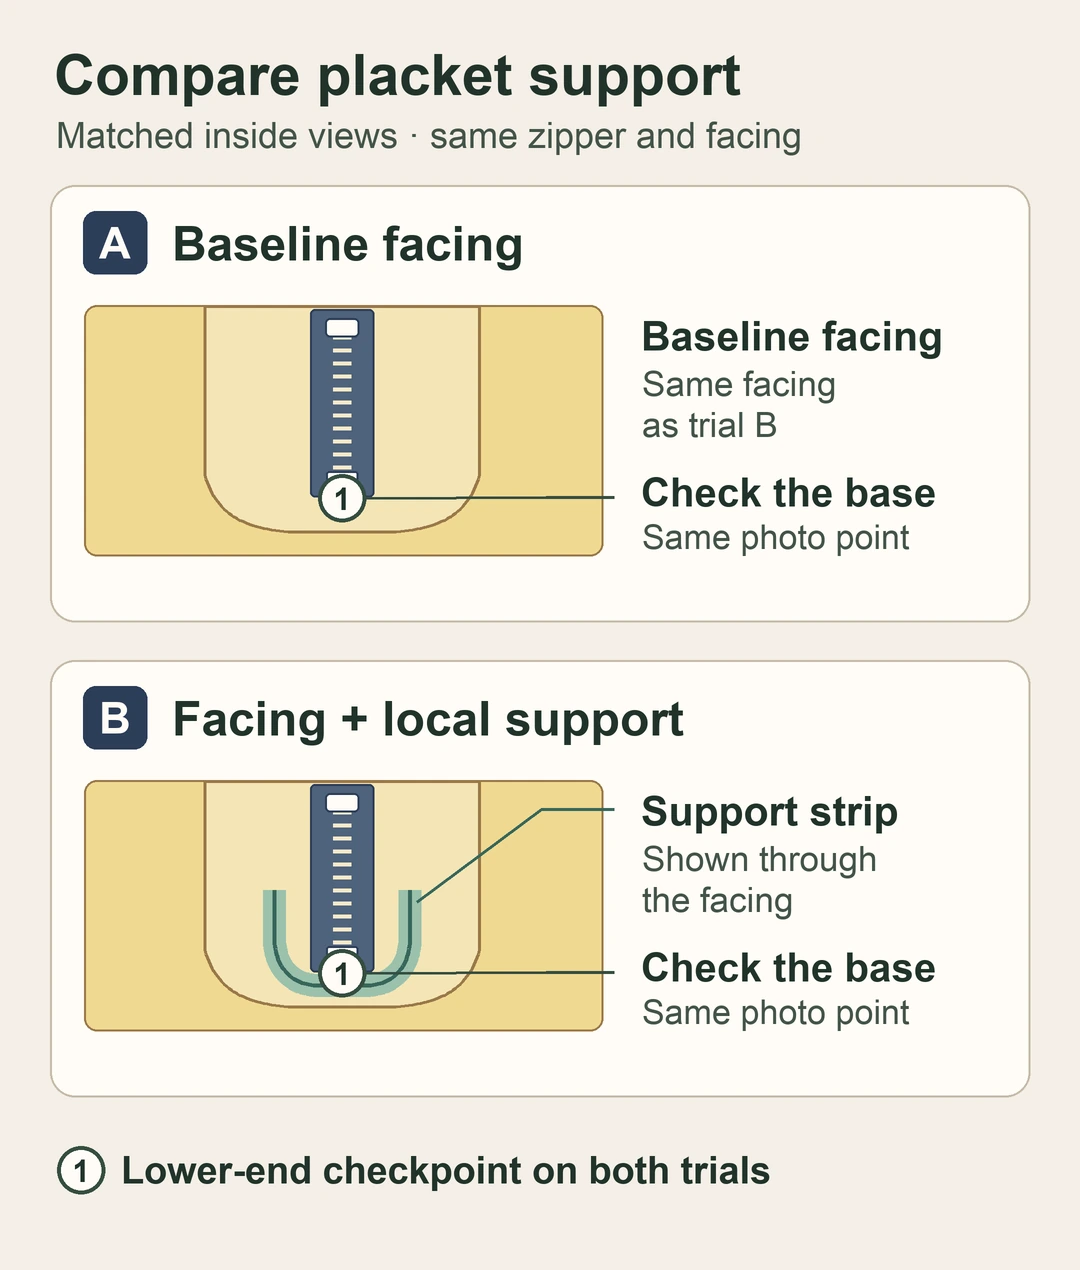
The same zipper and facing go into both trials. B adds a narrow support strip. In the example, B lies flatter at the lower end and moves to care review. Bulk stays on hold.
In this guide
- What Is a Placket on a Shirt?
- HC-S23 Worked Example and Blank Placket Approval Worksheet
- How to Specify a Short Zip Placket in a Tech Pack
- Compare Two Ways to Support the Same Placket
- Inspect the Sample Before and After Care
- Compare Supplier Quotes and Record Bulk Approval
- Frequently Asked Questions
- Develop a Zip Polo With HACOLD
What Is a Placket on a Shirt?
A placket is a finished opening in a garment, or the fabric construction used to finish that opening. On a shirt it may run down the front, stop partway below the collar or finish a cuff. On a zip Polo, the zipper opens and closes the garment, while the placket defines the shape and visible edges of the opening. The collar seam, inside facing and lower stop are separate details the buyer can mark on a drawing.
| Opening | What you see | What to specify |
|---|---|---|
| Full button front | The front separates from the neckline down to the hem. | Overlap, finished edge, button spacing and front alignment. |
| Short Polo button front | Buttons sit in a short opening and the lower front remains joined. | Opening depth, overlap, bottom finish and button positions. |
| Short zip Polo front | A zipper joins the two edges of a partial front opening. | Finished depth, zipper reference, collar alignment and support at the base. |
Look at the shirt with its closure open and closed. On a short opening, trace both edges down to the point where they meet the continuous body fabric. Look inside to see how the raw cut edge is finished and which parts of the zipper tape are covered. A front flat shows the location. An inside sketch or close-up tells the sample room how the pieces meet. For a worked button example, see the rugby shirt construction guide.
HC-S23 Worked Example and Blank Placket Approval Worksheet
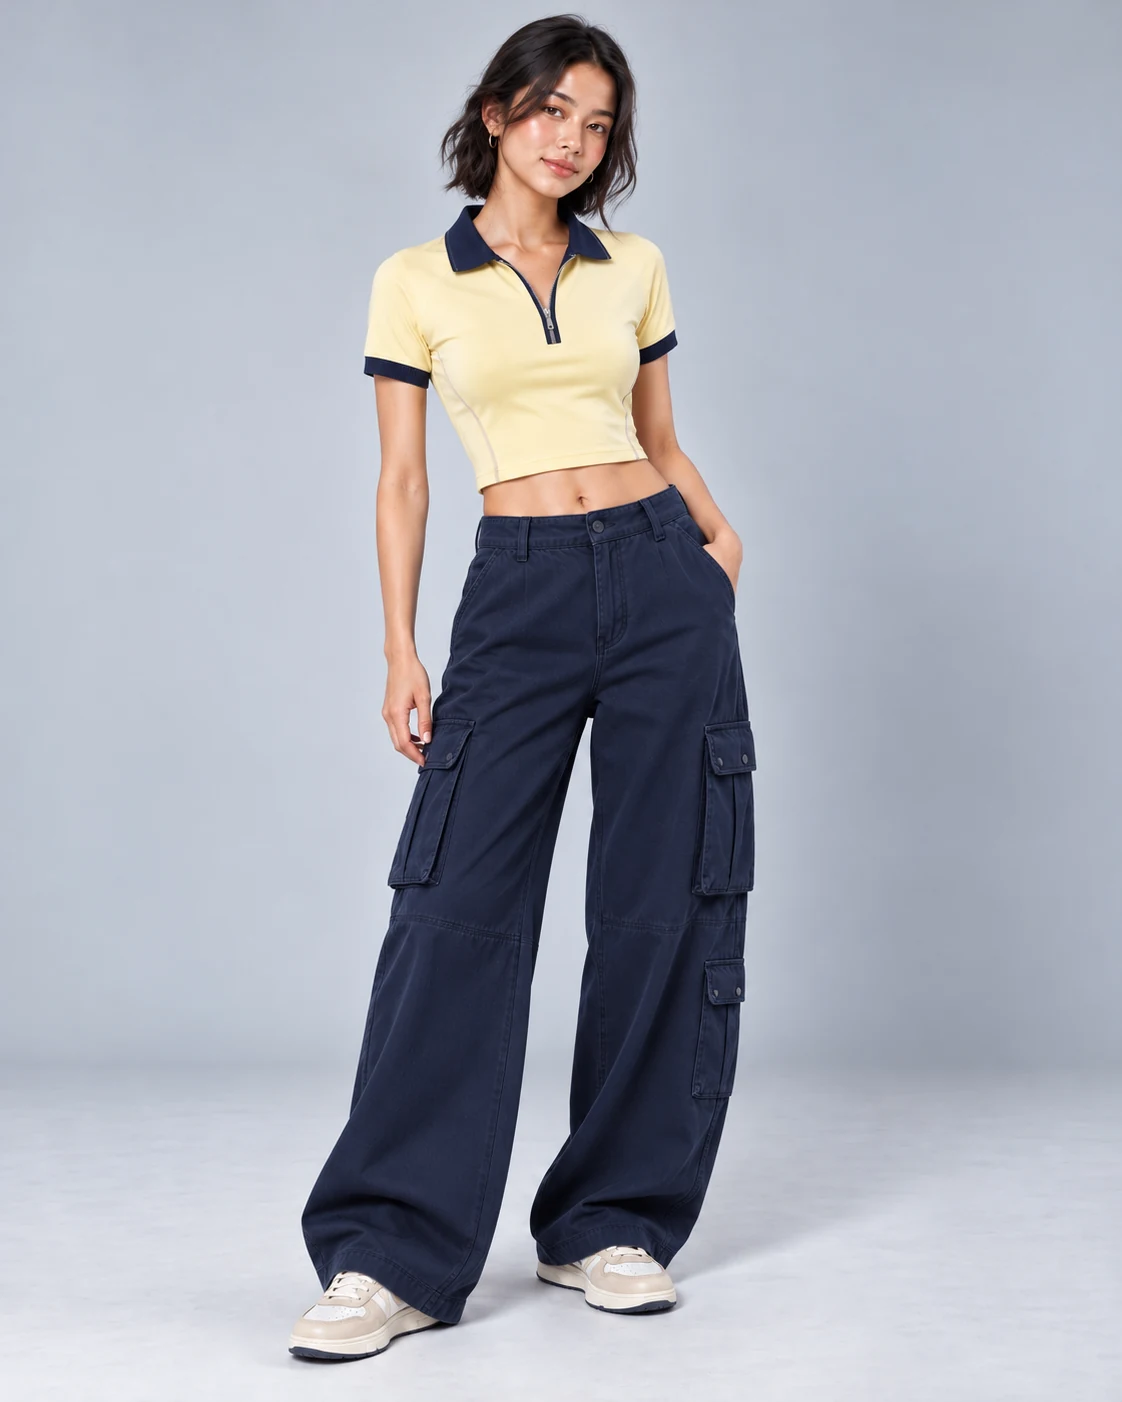
The HC-S23 concept shows a fitted butter-yellow cropped Polo with a navy collar, cuff trim and a short zip. Use those visible details to set a design direction. In the illustrative sample brief, the buyer defines a center-front opening and asks the supplier to compare two supports around its lower end. The values, trim ID and trial observations below are examples for filling the worksheet.
| Record | Filled example | Buyer decision |
|---|---|---|
| Finished opening | Size M, Rev A. Placket depth 120 mm, measured from the center-front neckline seam to the finished bottom edge. | Confirm the marked points and tolerance on the sewn garment. |
| Zipper order | Closed-end zip Z-01. The supplier proposes 110 mm on its trim drawing. Tape extensions are listed separately. | Confirm the zipper drawing and fit together before ordering trim. |
| A/B trial and quote | A uses the baseline facing. B keeps the facing and adds a narrow support strip. Quote the strip and operation separately. | B lies flatter at the base in this trial and advances to wear and care review. |
| Bulk sign-off | Hold. The finished garment, after-care readings and slider check are pending. | Update the release status against the reviewed sample ID and quote revision. |
Enter the design measurements and quotation in Placket spec and quote. Capture the setup, sewn comparison and post-wash observations in A-B and after-care checks. Record the retained sample, approval status and any trim changes in Approval and substitutions. The downloadable file starts with blank entry fields.
Download the blank placket approval Excel template
How to Specify a Short Zip Placket in a Tech Pack
Mark the Opening Depth and Finished Width
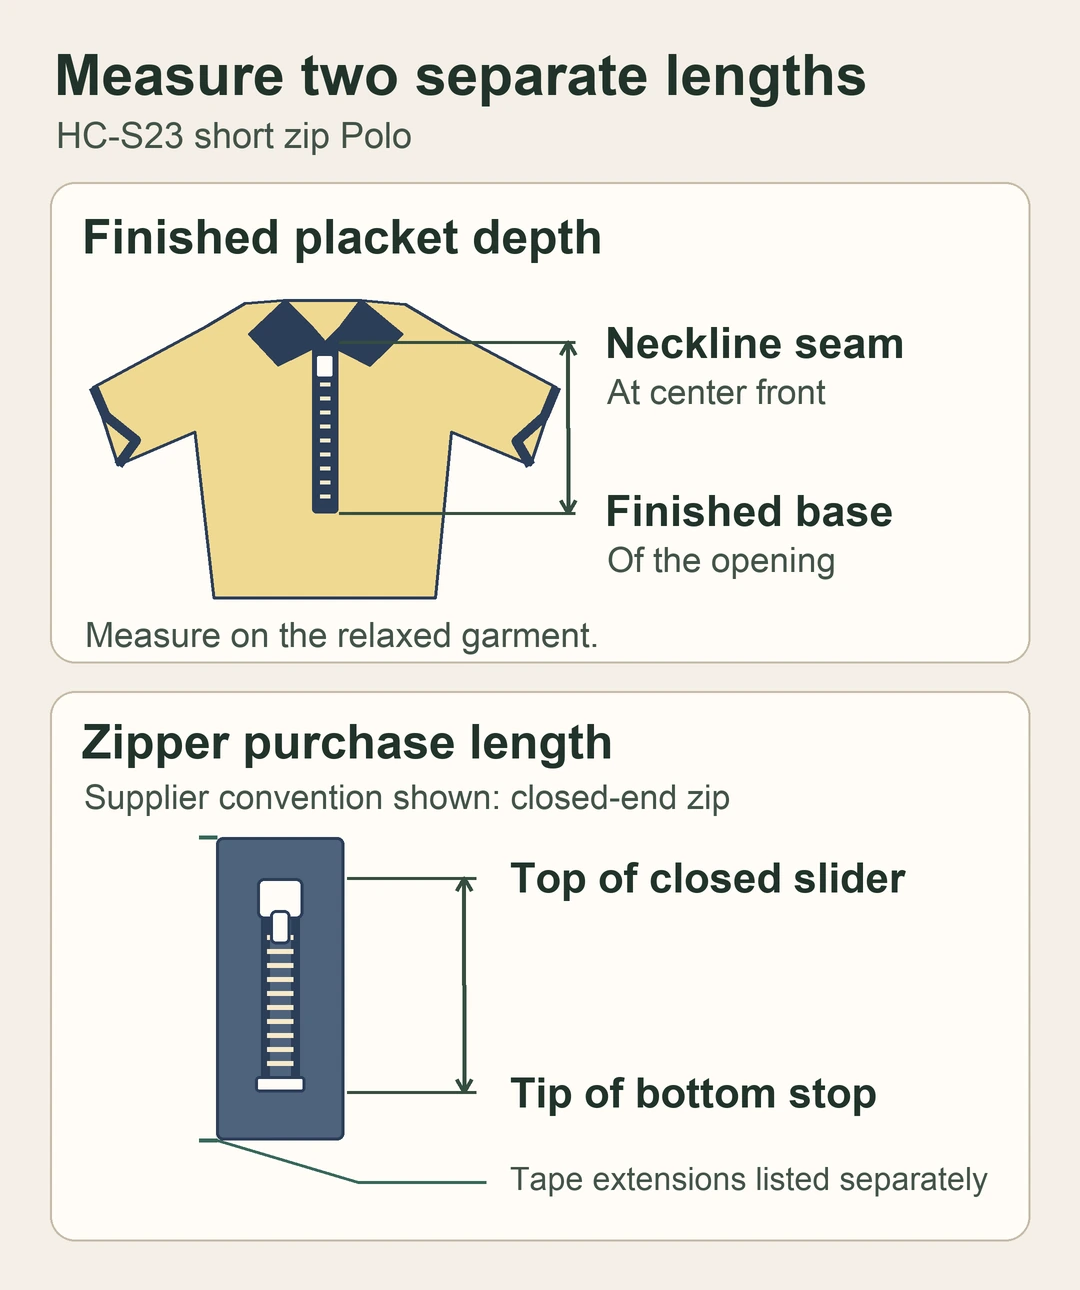
Draw a center-front line on the garment flat. Mark where it crosses the neckline seam and where the finished opening ends. Measure between those two points with the garment relaxed and the zipper closed, unless the measurement sheet specifies a different state. Check the distance across the finished placket edges at a named level so the supplier measures the same width each time. Attach a drawing that distinguishes these readings from the cut slit and seam allowances.
Show both collar points on the same drawing. Compare their positions with the slider raised and lowered to the agreed review position. A panel might look centered when it is open and pull to one side as the zipper closes. Capture a straight-on view against center front and a detail with the neckline seam visible. At size review, check the smallest proposed size against the intended head opening and confirm whether every size uses the same depth and zipper.
Give the sample room a width reference it can repeat, such as a marked station above the base. A reading taken at the top describes a different part of the opening. If the opening tapers, mark both stations and give each its own target. Compare the lengths on the size chart with the opening drawn on the smallest and largest pattern pieces. Record whether the closing hardware stays the same across the range.
Specify the Zipper and Support Separately
Use a purchase note for the zipper with its article code, type, tape color, slider and nominal length. YKK’s general guide for a conventional closed-end zipper measures from the top of the closed slider to the tip of the bottom stop and lists tape extensions separately. Ask the actual supplier to mark its convention and confirm the openings and trim against the sewn mock-up. YKK zipper dimensions
Show where you want the upper stop and lower stop to sit relative to the finished neckline and base seam. Record how much tape or teeth should be visible on the face. On the inside detail, draw the facing, show where it turns, and outline any support material. That drawing lets the factory quote the trim and the operations separately. For a broader choice of fastener constructions, use the zipper selection guide.
Ask the sewer to check that the slider can pass the facing edge with the garment flat and while worn. Include an enlarged photo or flat showing the intended clearance near the collar and the lower end. Check whether the pull tab sits comfortably at the closed neckline. If the neckline or hardware changes, ask the supplier to confirm the trim order on the new revision before ordering it.
Identify whether the bottom stop will be visible or covered and show the seam that closes the lower edge. Ask for an inside photo that makes it possible to see the stop, the end of the tape and the nearby stitch line together. Match the physical trim sample to the drawing revision before approval. Otherwise, a zipper with a similar visible finish may arrive with different tape ends or a different slider shape.
Compare Two Ways to Support the Same Placket
Keep the Zipper, Pattern and Knit Matched
The facing finishes the inside edge of the opening. A narrow strip under part of that assembly is one way to test local support. Start with the same pattern revision, size, knit, collar, facing and zipper for both trials. Ask for the same opening depth, stitch setup and pressing unless a change is required. Record any difference the factory had to introduce. If the body fabric or zipper changes too, identify the builds as separate options and review the effect of the combined change.
For the HC-S23 example, Trial A uses the baseline facing. Trial B uses that facing plus a narrow U-shaped support strip around the lower end, underneath the facing. Mark the proposed start, end and orientation on the inside drawing. Keep the size and shape of the facing consistent in both. Confirm the supplier can identify the strip by material reference before it is used in the next sample. The Polo fabric guide covers the separate decision between candidate knits.
Check Closure, Collar Alignment and the Lower Stop
Compare the face and reverse with the zipper fully closed and at the agreed open position. Check whether the lower seam stays flat, the two collar points look balanced and the slider moves without catching the facing. On the wearer, have the top opened and closed in normal use. Observe whether the base pulls when the wearer moves and whether the added support feels stiff through the front. A strip can improve one area while introducing a pronounced edge elsewhere.
Use the same camera angle and lighting for A and B. Photograph the whole front for alignment, then capture the base and neckline in close-up. In the example the lower end looks flatter in B. That observation is enough to move B to the next sample stage. Record the conditions still open, including feel, wash appearance and closure operation after care, so an advance decision is distinct from approval for bulk.
Agree which signs would send the sample back for revision. If the body twists while the zipper stays centered, check the fitted garment with the placket open and then closed. Repeat the photos with the garment relaxed. Putting both views beside the sewing notes helps the sample team decide whether to examine the opening, fit or fabric handling first. Make the next trial against that specific observation.
Inspect the Sample Before and After Care
Agree on care and drying conditions before comparing the samples. Record the specimen ID, number of cycles, the issue under review and the time allowed for the garment to rest before remeasurement. Photograph the same front and inside detail on each garment. Check depth and width at the marked stations, then record ripple, twisting, a visible support edge or discoloration as separate observations. Keep both original readings next to the post-care readings so a reviewer can locate the change.
Operate the zipper again after care. Note where drag begins and whether it occurs in both directions. Check the space between the slider and the facing at that point. If the navy trim or tape appears to have marked the pale body, record the affected location and photograph it alongside the retained shade reference. A visual mark identifies what to investigate. Refer to the color transfer by rubbing guide when repeated contact is a plausible source of the mark.
If a measurement changes, compare it with the agreed tolerance and look at where the change occurred. Compare left and right edge appearance at the same level and note any movement at the lower stop relative to the seam. Preserve the original measurements even when a reviewer decides the change is acceptable. The supplier needs the observed change as well as the disposition when repeating the construction.
AATCC TM143 covers appearance of finished textile products after home laundering, including seam smoothness. AATCC TM150 measures garment dimensional change after home laundering and its public scope flags that certain stretch fabrics may fall outside its applicability. Have the lab confirm method, edition and specimen if formal evidence is needed. The buyer’s recorded placket measurements, operating checks and acceptance limits belong on the sample record. AATCC TM143 public scope · AATCC TM150 public scope
Compare Supplier Quotes and Record Bulk Approval
Send the same drawing revision, zipper article, size and color breakdown to each supplier. Ask which version of the placket is priced and whether the quote includes the facing, support, zipper installation and the agreed sample checks. Request the cost basis and currency, plus any expense charged separately for setup, a second trial or the finished sample. Ask the supplier to identify the smallest-size limitations and any exceptional trim purchase requirements in the quote notes.
Compare offers against the same scope before judging differences in price. If one supplier proposes changing the facing or ordering a different zipper, ask for the proposed article reference, dimension drawing and revised quote. Have the supplier explain which sample checks must be repeated. The accepted version should be traceable to a documented change and the revised sewn assembly. Use the product development and sampling page to identify which approvals are still due at the next handoff.
If the size run requires two zipper lengths, ask the supplier to price them against the intended quantities by size. Check whether each length is ordered separately and whether the quoted tape shade and slider are available in both. Confirm which length is used on the base sample and what will be reviewed on the other sizes. That keeps the order breakdown aligned with the sample evidence and makes the effect of a change in size mix visible before the quote is accepted.
Record the selected A/B build, sample revision and retained garment size. Link the photos, trim sources, buyer tolerances and care results. If bulk is on hold, put the reason, owner and next action next to the decision. Once the buyer approves an option, send the supplier the approved drawing and quote revision together. That gives the person checking bulk the same landmarks and evidence the sample reviewers used.
Frequently Asked Questions
Is a Zipper the Same Thing as the Placket?
The zipper is the fastener. The placket is the finished opening and its fabric construction. On a short zip Polo the two are reviewed together, but the measurements and references serve different tasks. Use a garment flat to specify the opening and a trim drawing to identify the zipper, tape, slider and stops.
Does Placket Depth Equal Zipper Purchase Length?
Placket depth uses the agreed garment landmarks. Zipper purchase length uses the endpoints on the trim supplier’s drawing. Compare the two on a mock-up and verify where the upper and lower stops land once the zip is sewn in. Record any tape extensions separately so the ordering team has all three references.
When Should We Compare Different Support Treatments?
Compare options when the finished opening is visibly uneven, the base distorts during wear, or the facing catches during operation. First check that the cut shape and zipper are consistent with the drawing. Then change one support detail and document the result on both sides of the same seam before deciding whether to revise the pattern.
Which Checks Should We Repeat if the Zipper or Facing Changes?
Confirm dimensions and stop positions again, then recheck the slider, collar alignment and base with the new parts sewn together. Inspect the garment after the agreed care procedure if the change can affect appearance, movement or shade. Attach the updated quote, material reference and photos to the approval record before releasing the substitution.
Develop a Zip Polo With HACOLD
Send the front detail, zipper and collar references, size run, planned quantities and the decision you want the first sample to settle. Open the Polo shirt development gallery, select HC-S23, and choose Prepare an RFQ for this style. The HC-S23 inquiry carries the reference into the project description. The same style panel offers email and WhatsApp contact for the concept.